
Jen Looper is a Developer Advocate at Telerik where she specializes in creating cross platform mobile apps. She’s a multilingual multiculturalist with a passion for hardware hacking and learning new things every day.
NativeScript is Telerik’s open source runtime that allows you to build truly native cross-platform iOS and Android mobile apps with a single codebase using JavaScript, XML, and CSS. When building the application UI, developers use our libraries, which abstract the differences between the native platforms. To learn more, take a look at the video below, go through the documentation, take a Udemy course, or download an app built with NativeScript.
Firebase Plugin
Building NativeScript apps just got a lot easier thanks to the new Firebase Plugin by Plugin Master Eddy Verbruggen. This plugin brings the speed and realtime connectivity of Firebase to NativeScript.
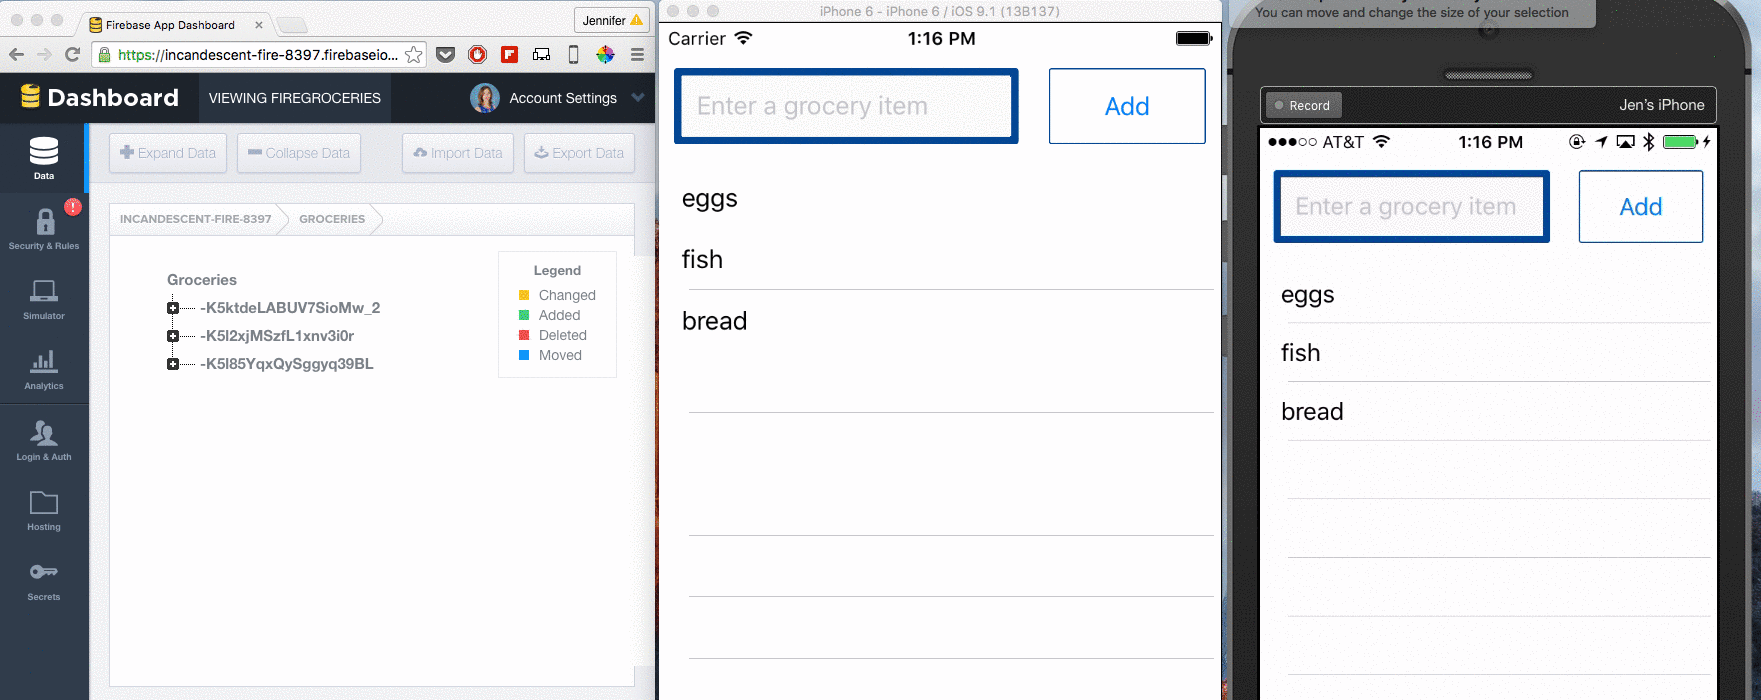
Let’s get started by building a Groceries app! Here it is in action with my iPhone feeding data to my simulator, and vice versa:
1. Setup
You’re going to need NativeScript installed on your computer, first and foremost. To do that on a Mac, you’ll need Homebrew and Node.js 0.10.x, or 0.12.x, or the 4.2.x stable official release; follow the installation instructions here.
On a PC, installation instructions are here, and on Linux, installation instructions are here.
Currently, this app is designed to use Telerik’s backend services as its database tier. In this tutorial, I’ll demonstrate how to create a new user, login using those credentials, and manage grocery lists, creating and deleting data using Firebase as the app’s backend.
You can follow along by forking the ‘end’ branch of the NativeScript Getting Started Guide’s Groceries app, or check out the completed project here.
2. Connect Firebase to the app
The Groceries app is already set up with everything you need to get up and running quickly with a backend solution. Currently it assumes that you use Telerik backend services. To use Firebase instead, we first need to install the firebase plugin by executing the following command in the root of your app’s folder:
tns plugin add nativescript-plugin-firebaseYou’ll note that a line has been added to package.json file in the root folder:
"nativescript-plugin-firebase": "^1.2.0"You can update the plugin version by editing package.json and run npm install in the root of the project when needed, to keep the plugin installation up to date with new features. Now you can add the Firebase URL as the apiURL in your config file. In /app/shared/config.js, edit the apiUrl`:
module.exports = {
  apiUrl: "https://incandescent-fire-8397.firebaseio.com/"
};
Next, add a method to initialize Firebase. In app/views/login/login.js, add a line to call user.init() at the end of the load() function, and then create the init() function in app/shared/view-models/user-view-model.js by adding this code above the login() function:
viewModel.init = function(){
  firebase.init({
      url: config.apiUrl
  }).then(
    function (instance) {
      console.log("firebase.init done");
    },
    function (error) {
      console.log("firebase.init error: " + error);
    }
  );
};
Since Firebase will replace the need to fetch data manually from another datasource, you can overwrite a require statement at the top; replace var fetchModule = require("fetch"); with var firebase = require("nativescript-plugin-firebase");
Now, you have initialized Firebase as your app’s backend. If you run your app, you should see the console statements coming through, telling you the initialization was successful. The next step is to get your users set up.
3. Add registration and login
The Firebase plugin, right now, supports registration with a username and password and login with the same technique, as well as ‘anonymous login’. We’re going to use the former, so enable Email and Password authentication by checking the appropriate box in the Login & Auth tab of your Firebase dashboard:

Replace the login() and register() functions in app/shared/view-models/user-view-model.js with the following functions:
viewModel.login = function() {
    return firebase.login({
        type: firebase.loginType.PASSWORD,
        email: viewModel.get("email"),
        password: viewModel.get("password")
      }).then(
        function (response) {
            config.uid = response.uid
            return response;
        });
};

viewModel.register = function() {
    return firebase.createUser({
        email: viewModel.get("email"),
        password: viewModel.get("password")
      }).then(
          function (response) {
            console.log(response);
            return response;
          }
      );
};Note: You can delete the function handleErrors() from the code, as Firebase bubbles up helpful error messages such as email address already in use or incorrect passwords. In addition, you can remove the code to check for valid email addresses, as Firebase does that for you as well. If you do delete the email checking code, which is normally handled by an npm module, your register() function in app/views/register/register.js can be simplified to this:
exports.register = function() {
    user.register()
        .then(function() {
            dialogsModule
                .alert("Your account was successfully created.")
                .then(function() {
                    frameModule.topmost().navigate("views/login/login");
                });
        }).catch(function(error) {
            dialogsModule.alert({
                message: error,
                okButtonText: "OK"
            });
        });
}
Then you can delete the completeRegistration() function entirely. Firebase makes these basis authentication tasks nice and easy! Go ahead and register for your app, a process that takes you from registration, to login, and over to your grocery list in this codebase.
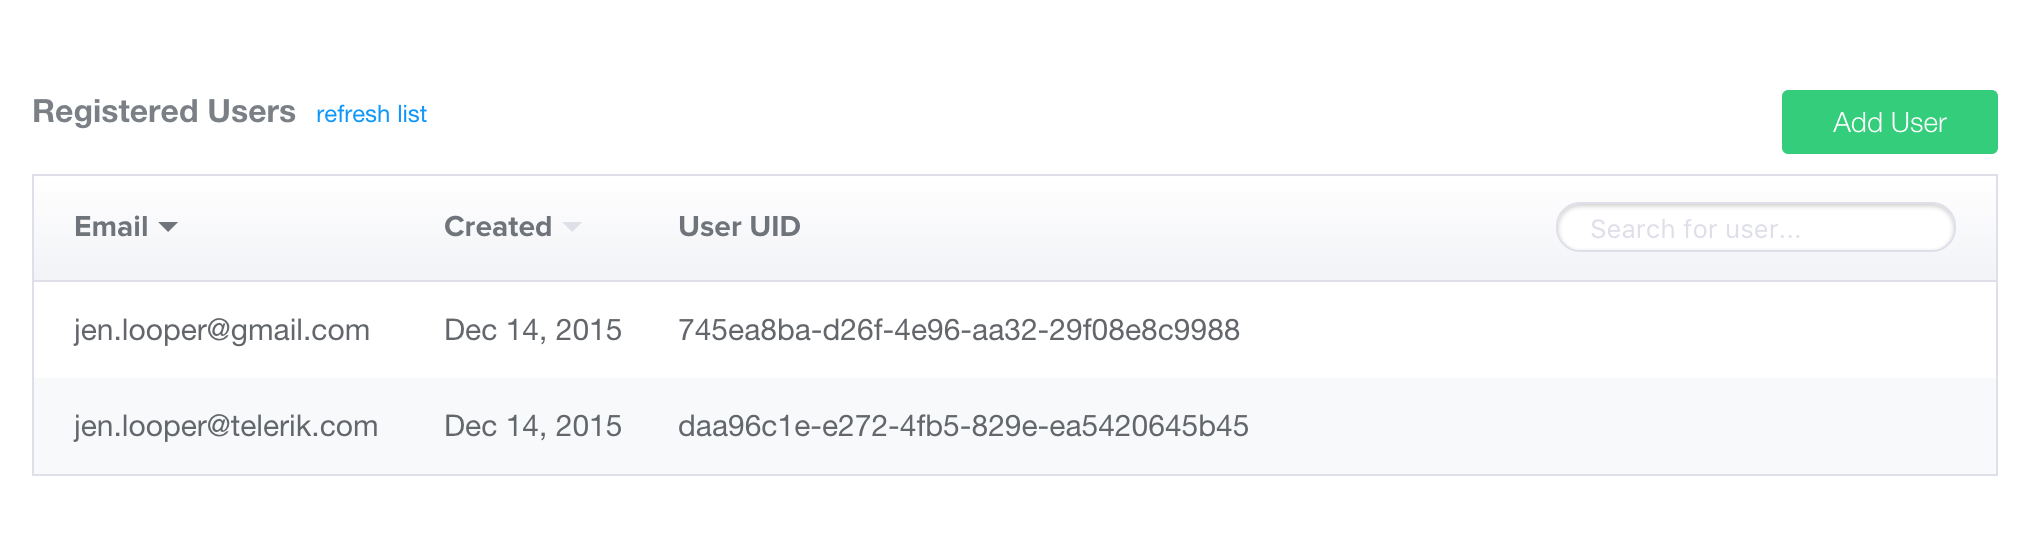
Check your Firebase app to see your registration in the Registered Users section of the Login & Auth tab of the Firebase dashboard:
Note, when you login, you save your user’s ID as generated by Firebase. You’ll use that to create user-specific content in the Groceries collection that we’ll work on next.
4. Delete Groceries
We now need to set up a listener for Firebase to check for fresh data coming in and going out of your app to start creating personal grocery lists. Replace the load() function in app/shared/view-models/grocery-list-view-model.js with this code:
//to get the index of an item to be deleted and handle the deletion on the frontend

function indexOf(item) {
  var match = -1;
  this.forEach(function(loopItem, index) {
    if (loopItem.id === item.key) {
      match = index;
    }
  });
  return match;
}

function GroceryListViewModel(items) {

  var viewModel = new observableArrayModule.ObservableArray(items);
  viewModel.indexOf = indexOf;

  viewModel.load = function() {

    var onChildEvent = function(result) {
      var matches = [];

      if (result.type === "ChildAdded") {
        if (result.value.UID === config.uid) {
          viewModel.push({
            name: result.value.Name,
            id: result.key
          });
        }
      } else if (result.type === "ChildRemoved") {
        matches.push(result);
        matches.forEach(function(match) {
          var index = viewModel.indexOf(match);
          viewModel.splice(index, 1);
        });
      }

    };

    return firebase.addChildEventListener(onChildEvent, "/Groceries").then(
      function() {
        console.log("firebase.addChildEventListener added");
      },
      function(error) {
        console.log("firebase.addChildEventListener error: " + error);
      }
    )
  };
This function sets up a “child event listener” to check for data coming in and out of the /Groceries collection in Firebase. If there is no such collection, it will be created by default. When the app detects a “child event” such as data being added to the list when the app is loaded, the app will check whether the config.uid and the UID of the data - e.g. to whom it belongs - match, and then allow the data to populate the list.
Note: the Firebase plugin exposes a child event listener and a value event listener. Use the value event listener to test for overwritten data, and the child event listener to check for additions and deletions to a given collection.
Adding data to this list is really simple. Overwrite the add() function in app/shared/view-models/grocery-list-view-model.js:
viewModel.add = function(grocery) {
  return firebase.push( '/Groceries', {
    'Name': grocery,
    'UID': config.uid
  });
};
Replace the delete() function with equally simple code:
viewModel.delete = function(index) {
  var id = viewModel.getItem(index).id;
  return firebase.remove("/Groceries/"+id+"");
};
The add and delete functions push or remove items, tagged with the user’s uid (for addition) and delineated by the item’s id (for deletion), providing a quick way to manage the snappy collection management inherent to Firebase. The listeners that you set up when loading the page handle reshuffling data on the client side when a child event is detected. It’s really fast!
What’s next?
It will be a nice enhancement to allow file uploads and more social logins like Twitter, Facebook, and Google authentication, to be handled by this plugin. In addition, if you leverage the value listener and check for edited items on the front end, an editing functionality could be added to this app. The sky’s the limit with a NativeScript app powered by Firebase!