
We’re happy to see many developers experimenting with Firebase! Some of you have been transitioning your experiments to production, and that’s raised some questions about how to manage the builds of your Android projects. The most common question goes something like this: “How do I keep my everyday development data separate from my release data?”
We’d all like our analytics to reflect only the actual usage of the app (as opposed to artificial usage during development). Also, it’s not useful to see crashes from moment-to-moment development interleaved with those from our publicly released versions. On top of that, as your team grows and your app becomes more complex, you may want to separate each team member’s working space into separate sandboxes so that their work won’t collide with each other.
So, let’s explore some ways to configure your project to best handle these cases. For Android app builds, the preferred path is to take advantage of some configuration features of the Android Gradle plugin. These can be applied alongside some configurations in the Firebase Console.
But before I discuss these configurations, let’s get some terminology settled! Here are some terms we’ll use:
Terminology
Firebase project
A project created from the top level of the Firebase Console. After creation, it appears as a card here.
Firebase app
An app created within a Firebase project. A Firebase project can contain any number of Android and iOS apps, which appear on the project’s home screen. Apps within a project share some configurations with each other, and also have some separate configurations (more on this later).
Android Gradle build type
When the Android Gradle plugin configures your app at build time, it defines, by default, “debug” and “release” build types. These are configured in the buildTypes block, and you can add additional types as needed. The debug type is configured for everyday development, and release is meant for distribution to users.
Android Gradle build flavor
When configuring an Android app at build time, it can optionally be assigned a “build flavor”. These are similar to build types, but build flavors allow further independent configurations as needed. For example, you can build both “free” and “paid” versions of your app that are mostly the same, except for some key differences, such as application ID and the features you choose to enable.
Android Gradle build variant
A build variant is a distinct combination of build type and build flavor. In an app build configuration, there is exactly one variant for each possible combination of type and flavor. For example, if you have debug and release types configured, as well as “free” and “paid” flavors configured, the Android Gradle plugin will generate a matrix of variants containing the combinations “debug/free”, “debug/paid”, “release/free”, and “release/paid”. Every APK built from your code will be exactly one of these variants.
Android Application ID
A string that identifies an app from other apps. This value must be unique from all other apps when published to the Play Store. This is typically formatted like a Java package name, such as “com.company.project”.
The key concept, for effective configuration of an app with Firebase, is to assign a distinct application ID to each build variant of an app that requires its own collection of data. This is something you do in your app’s build.gradle first, then mirror in the Firebase Console. But first, to make a decision about configuration that’s best for your app, there are some more things you need to know about how the different Firebase features work between your Firebase projects and apps.
Data scoping per Firebase feature
Some Firebase features share their data between all the apps (Android, iOS, and web) within the same project. You could say that the data for these features are “scoped” to an entire Firebase project:
Some Firebase features have independent data for all the apps within the same project. You could say that these features are scoped to the individual apps in your Firebase project:
You’ll notice that the dashboards for both Analytics and Crash Reporting have an app selector near the top of their dashboards that let you select the individual app (of all those created in the project) whose data you want to view.
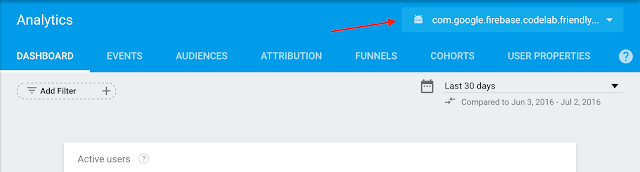
The Analytics dashboard shows an app selector.
Some Firebase features have a hybrid scope, where any number of apps may be affected by a particular operation:
- Remote Config can provide different values between apps in a project, but the default is for all apps to get the same value
- Notifications can target one or multiple apps within a project - you choose at the console
- Dynamic Links can target a single Android and/or one iOS app. The link can decide which to target based on current platform
Firebase Test Lab for Android has its own special case because it requires a project with billing enabled, but it can be used with any APK without any constraint in a single project. So, if you want to develop with Firebase on a free plan, but test the APK using Test Lab on a paid plan, it’s recommended to create a whole new project and enable billing just for use of Test Lab. You can test any app in this project, with or without Firebase integrated.
Now, this is a` all good to knowledge to have, but why don’t we make this more practical with some actual examples? I’ll share some recipes for configuration next. The best case for your situation might be one of these exactly, or some hybrid.
Team examples
Small team, simple app
Let’s say you’re an individual developer or on a small team, your app is relatively simple, and you just need to separate your analytics and crash reports between your daily debug and published release builds. In this case, it would suffice to configure your app to have a different application ID for debug and release. Here’s a bit of a Gradle configuration that might help:
    defaultConfig {
        applicationId "com.company.project"
        // etc...
    }
    buildTypes {
        debug {
            applicationIdSuffix ".debug"
        }
        release {
            // etc...
        }
    }
Here, the application ID is “com.company.project”, which gets applied to the release build. But the application ID for the debug build becomes “com.company.project.debug”. You don’t have to use a suffix like this - instead you could specify a whole new value with applicationId.
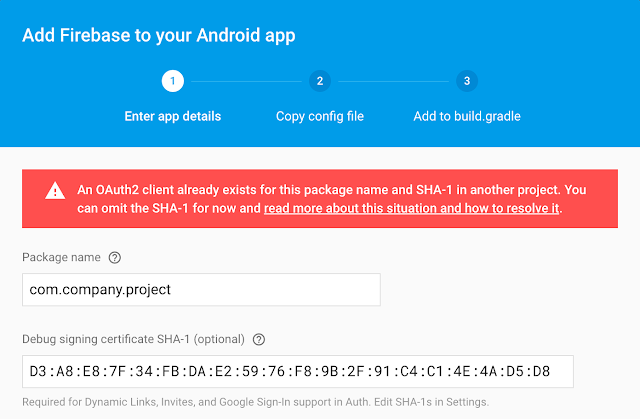
Then, in the Firebase Console, you would create a single project, and within that project, create two apps, one for each build type. The debug app would use the application ID “com.company.project.debug”, and the release app would use “com.company.project”. The SHA-1 hashes would also have to reflect the different keys used to sign each build, if you’re using Firebase features that require it.
Two apps in a single project, one for debug, the other for release, with different app ids.
After both apps are created, download a google-services.json file from the console and place it into your app. If you look inside that file, you’ll notice that both apps will appear in there. The Google Services plugin will figure out which set of configurations to use during the build of each variant.
"client_info": {
   "mobilesdk_app_id": "...",
   "android_client_info": {
     "package_name": "**com.company.project.debug**"
   }
},

"client_info": {
  "mobilesdk_app_id": "...",
  "android_client_info": {
    "package_name": "**com.company.project**"
  }
google-services.json will contain info for all Android apps in a project.
It’s important to know that if this project is on a billing plan, you’ll be billed for all bandwidth and storage generated by both apps. So if you’re pulling lots of data during development, that may result in additional charges. Be sure to understand the [pricing plans] to plan for this so you’re not surprised by the bill.
It’s also important to note that, with this configuration, you will be working against all the same data during development as your active users on your fully released app. This may not be the safest thing, if you intend to disrupt your Realtime Database data or experiment with Remote Config values during development!
Large team, safer development
The prior recipe of doing development against your live data may be problematic. If you have a large team with lots of people making unsafe updates to the data, or you generally want to prevent the risk of corrupting production data, you’ll need to set up multiple projects to isolate development data from production data. In fact, you could have everyone on the team use their own individual “sandbox” projects on the free tier so they can experiment safely without affecting others or incurring any billing.
To set this up, you don’t really need to do anything special in your build.gradle. Everyone can use the same application ID to create an app in their sandbox project. However, they’ll each need their own unique debug key to sign with. The Android SDK tools create a unique debug key for each user of the SDK, so normally that shouldn’t be a problem. But it should be known that the Firebase Console will not allow an app to be created that has a duplicate pair of application ID and SHA-1 key as any other app in any project in any account. So if your team members were sharing a debug key, that won’t work with this setup.
The Firebase console won’t allow duplicate combinations of package name and SHA-1.
This arrangement is great to keep everyone isolated, but there’s one caveat. Since all the developers will be creating their own project, they may also have to duplicate some configurations to make the project work correctly. For example, the database for a new project may need to be bootstrapped with some useful data. And the correct security rules should be duplicated. Remote Configs may need to created with appropriate values. Authentication may need to be configured as well. And, of course, every developer will need to use the google-services.json file generated for their own project, and should not be checked into source control, in order to avoid conflicts between team members.
Dev, QA, Stage, Prod environment isolation
If you have a situation where you need data isolation between different environments, the best way to set that up is similar to the large team setup above. You’ll definitely need to create different projects for each environment. They can all be owned by the same account or by different accounts.
To make it easy to select the environment to build for, you can take advantage of build flavors to configure each version of the app. For example, if you need isolation for development, QA, and production, you could define three build flavors in the productFlavors block, which goes next to the buildTypes block in the app’s build.gradle:
    productFlavors {
        dev {
        }
        qa {
        }
        prod {
        }
    }
Here, we’re not indicating that there’s anything different between the variants except that they exist separately. They’ll all have the same application ID, which is OK. Or you could assign them distinct IDs if that helps your situation. In either case, you’ll need to use a flavor-specific directory to contain the google-services.json file from each project. By default, the Android Gradle plugin recognizes the following convention for organizing the directories for each flavor as defined above:
    app/
        src/
            main/
            dev/
                google-services.json (for dev only)
            qa/
                google-services.json (for qa only)
            prod/
                google-services.json (for prod only)
Notice that each named flavor becomes the name of a directory that sits in src adjacent to the main directory where your project code typically lives. With this structure, you can drop the google-services.json for each project directly into its dedicated directory. Now, if you want to build the “dev” flavor of the app, you can select “devDebug” from the build variants window in Android Studio, or target the variant’s build task “assembleDevDebug” on the Gradle command line.
Still have questions?
If you have an unusual situation with your app build that isn’t really helped by the information here, please don’t hesitate to ask a question at the firebase-talk Google Group. And, for more urgent support matters, please file an issue on the Firebase Support site. And please follow me on Twitter as CodingDoug!