
Debugging Firebase Cloud Messaging is one of the most common Firebase-on-iOS questions I see on StackOverflow. And so in an effort to garner as many StackOverflow points as I can (oh, yeah, and to educate the developer community), I thought it might be helpful to write up a full debugging guide on what to do when you can’t seem to get Firebase Cloud Messaging (FCM) working on your iOS device. First off, I’d recommend taking a moment to watch our Understanding FCM on iOS video. It’ll give you a better idea of what’s going on underneath the hood, which is always useful when you’re trying to debug things. Go ahead! I’ll wait.
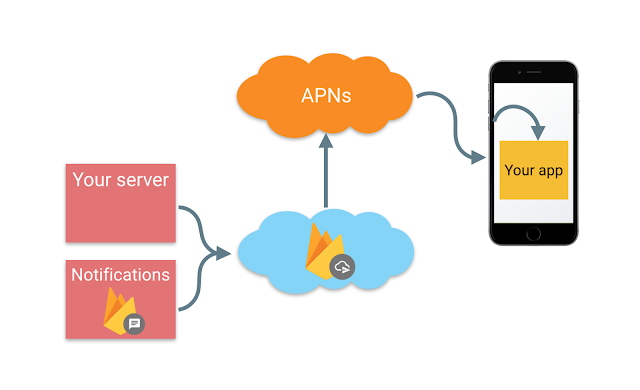
Okay, back? So you probably noticed in the video that we have several systems all talking to each other:
- Your app server (or Firebase Notifications) talks to Firebase Cloud Messaging
- Firebase Cloud Messaging then talks to APNs
- APNs talks to your user’s target device
- On your user’s target device, iOS communicates with your app.
Tips
These four paths of communication means there are four opportunities for things to go wrong. And when they do, they very often manifest as a frustrating “It says my notification was sent, but nothing showed up on my device” kind of bug, which requires some real detective work. So here are the steps I recommend you go through to start tracking down these errors.
1. Temporarily disable any connectToFCM() calls
If you’ll recall from the video, your app can explicitly connect to Firebase Cloud Messaging by calling connectToFCM() when it’s in the foreground, which allows it to receive data-only messages that don’t have a content-available flag directly through FCM.
And while this can be useful in certain circumstances, I recommend disabling this while you’re debugging. Simply because it’s one extra factor that you want to eliminate. I’ve seen a few, “My app receives notifications in the foreground, but not in the background” problems out there that probably occurred because the developer was only receiving messages through the FCM channel, and their APNs setup was never actually working properly.
If things break at this point: If you suddenly go from “Hey, I was receiving foreground notifications” to “I’m not receiving any notifications at all”, then this is a sign your app was never properly set up to receive notifications from APNs in the first place. So your app might be a little more broken than before, but at least now it’s consistently broken. (Hooray!) Keep reading to debug your APNs implementation!
For the next several steps, we’re going to go backwards through that “Notifications to FCM to APNs to iOS to your app” chain. Let’s start by making sure that iOS can actually speak to your app…
2. Add some good ol’ fashioned print() debugging
Thanks to some clever method swizzling, Firebase Cloud Messaging makes it totally unnecessary for you to implement either application(_:didRegisterForRemoteNotificationsWithDeviceToken:) or application(_:didFailToRegisterForRemoteNotificationsWithError:) in your app delegate.
However, for debugging purposes, I like to add in these methods and print out some debug information to see if there are any errors happening that I should be aware of. Start by adding some debug output to your failure method. Something like this:
func application(_ application: UIApplication,
    didFailToRegisterForRemoteNotificationsWithError error: Error) {
  print("Oh no! Failed to register for remote notifications with error (error)")
}
In theory, any error message printed out here will also probably be printed out by the FCM client library, but I like having my own messages because I can search for specific strings (like “Oh no!” in the above example) among all the Xcode output. This also gives me a handy line of code where I can add a breakpoint.
While you’re at it, in your didRegister... method, go ahead and print out a human-readable version of your device token:
func application(_ application: UIApplication,
    didRegisterForRemoteNotificationsWithDeviceToken deviceToken: Data) {
  var readableToken: String = ""
  for i in 0..<deviceToken.count {
    readableToken += String(format: "%02.2hhx", deviceToken[i] as CVarArg)
  }
  print("Received an APNs device token: (readableToken)")
}
You don’t need to disable method swizzling or anything to add these debug methods. Firebase will go ahead and call them just as soon as it’s done calling its own set of methods.
If you’re seeing an error message at this point: If you either receive an error message or don’t get back a device token, check the error message for a good hint as to what went wrong. Most mistakes at this point fall under the, “I’m embarrassed to tell anybody why it wasn’t working” category. Things like:
- Testing on the iOS simulator and not the device.
- Forgetting to enable Push Notifications in your Xcode project settings.
- Not calling
application.registerForRemoteNotifications()when your app starts up.
Sure, these are simple mistakes, but without the benefit of printing out messages to the Xcode console, it’s easy for them to go unnoticed.
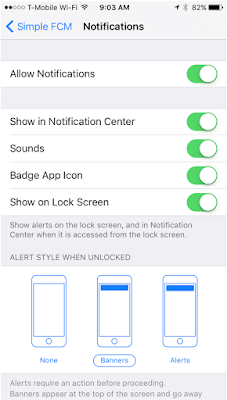
3. Confirm that you can send user-visible notifications
As with any iOS app, you need to explicitly get the user’s permission to show any kind of notification alert or sound. If you’re in a situation where your app doesn’t appear to be receiving notification messages in the background, your app simply might not have permission from iOS to do so.
You can check this in iOS >= 10 by adding the following code somewhere in your app.
UNUserNotificationCenter.current().getNotificationSettings { (settings) in
  print("Alert setting is (settings.alertSetting ==
    UNNotificationSetting.enabled ? "enabled" : "disabled")")
  print("Sound setting is (settings.soundSetting ==
    UNNotificationSetting.enabled ? "enabled" : "disabled")")
}
If you’re seeing “disabled” messages at this point: Either you accidentally denied granting your app permission to send you notifications, or you never asked for permission in the first place.
If you accidentally clicked on the “Don’t allow” button when the app asked you for permission to send notifications, you can fix this by going to Settings, finding your app, clicking on Notifications, then clicking the Allow Notifications switch.
On the other hand, if you never asked for permission to show user-visible permissions, then it means you need to add code like this (for iOS >= 10) within your app somewhere:
let authOptions : UNAuthorizationOptions = [.alert, .badge, .sound]
UNUserNotificationCenter.current().requestAuthorization(options: authOptions)
  { (granted, error) in
    if (error != nil) {
      print("I received the following error: (error)")
    } else if (granted) {
      print ("Authorization was granted!")
    } else {
      print ("Authorization was not granted. :(")
    }
  }
But if everything looks good at this point, you can move on to debugging the APNs connection!
4. Make a call directly through APNs
Remember; just because you’re using FCM to handle your notifications doesn’t mean you can’t also use APNs directly. There are a few ways you can try this; one option is to use an open-source tool like NWPusher to send test notifications. But personally, I prefer sending APNs requests directly through a curl call.
Making an APNs curl request is easier these days now that APNs supports HTTP/2. But it does mean you’ll need to make sure your copy of curl is up-to-date. To find out, run curl –version. You’ll probably see something like this:
curl 7.47.1 (x86_64-apple-darwin15.6.0) libcurl/7.47.1 OpenSSL/1.0.2f zlib/1.2.5 nghttp2/1.8.0
Protocols: dict file ftp ftps gopher http https imap imaps ldap ldaps pop3 pop3s rtsp smb smbs smtp smtps telnet tftp
Features: IPv6 Largefile NTLM NTLM_WB SSL libz TLS-SRP HTTP2 UnixSockets
If you want to talk to APNs, you’ll need a version of curl that’s greater than 7.43, and you’ll need to see HTTP2 among the features. If your version of curl doesn’t meet these requirements, you’ll need to update it. This blog post by Simone Carletti gives you some pretty nice instructions on how to do that.
Next, you’ll need to convert the .p12 file you downloaded from the Apple Developer Portal to a .pem file. You can do that with this command:
openssl pkcs12 -in MyApp_APNS_Certificate.p12 -out myapp-push-cert.pem -nodes -clcertsYou’ll also need the APNs device token for your target device. If you added the debug text listed earlier in your application(_:didRegisterForRemoteNotificationsWithDeviceToken:) method, you’ll be able to grab this from your Xcode console. It should look something like ab8293ad24537c838539ba23457183bfed334193518edf258385266422013ac0d
Now you can make a curl call that looks something like this:
> curl --http2 --cert ./myapp-push-cert.pem
-H "apns-topic: com.example.yourapp.bundleID"
-d '{"aps":{"alert":"Hello from APNs!","sound":"default"}}'
https://api.development.push.apple.com/3/device/ab8293ad24537c838539ba23457183bfed334193518edf258385266422013ac0d
Three things to notice here:
- That
--certargument should link to the.pemfile you created in the previous step. - For the
apns-topic, include the bundle ID of your app. And yes, the concept of apns-topics are completely different than Firebase Cloud Messaging topics. - Make sure your device ID is included at the end of that URL there. Don’t just copy-and-paste the one that I have. It won’t work.
If all has gone well, you’ll see a push notification on the device, and you can move on to the next step. If not, here’s a few things to look for:
-
Are you getting back any error message from APNs? That’s a pretty good sign something has gone wrong. Common messages include:
-
“Bad device token” – This is what it sounds like. Your device token is incorrect. Double-check that you’ve copied it correctly from your app
-
“Device token not for topic” – This might mean that your topic isn’t properly set to your app’s bundle ID. But it also might mean that you’re not using the correct certificate here - I’ve gotten this message when I’ve used the wrong .pem file.
-
Is your app in the background? Remember that iOS will not automatically show notification alerts or sounds if your app is in the foreground.
-
However, in iOS 10, they’ve made it significantly easier to have iOS show these alerts even if your app is in the foreground. You just need to call
completionHandler([.alert])at the end ofuserNotificationCenter(_:willPresent:withCompletionHandler:) -
Are you sending valid APNs requests? There are a few types of requests that, while syntactically correct, may still get rejected. At the time of this writing, these include sending silent notifications that don’t include the content-available flag, or sending silent notifications high priority.
-
In addition, iOS may throttle silent notifications if your app neglects to call its completionHandler in a reasonable amount of time upon receiving them or uses too much power to process these notifications. Refer to Apple’s documentation for more information.
-
Is APNs having issues? You can double-check the status of APNs and the APNs Sandbox over at https://developer.apple.com/system-status/
But if things seem to be working correctly here, it’s time to move on to the next step…
5. Make a curl call directly through FCM
Once you’ve confirmed your APNs call seems to be working properly, the next step is to confirm the FCM part of the process is working. For that, I also like to make another curl call. For this to work, you’re going to need two things: The server key and the FCM device token of your target device.
To get the server key, you’ll need to go to the Cloud Messaging settings of your project in the Firebase Console. Your server key should be listed there as a giant 175-character string.

Getting your FCM device token is slightly more work. When your app first receives an APNs token, it will send that off to the FCM servers in exchange for an FCM device token. When it gets this FCM token back, the FCM library will trigger an “Instance ID Token Refresh” notification. 1
So listening to this firInstanceIDTokenRefresh NSNotification will let you know what your FCM device token is, but this notification only gets triggered when your device token changes. This happens infrequently – like when you switch from a debug to production build, or when you run your app for the first time. Otherwise, this notification will not be called.
However, you can retrieve your cached FCM device token simply through the InstanceID library, which will give you any stored device token if it’s available. So to get your latest-and-greatest FCM token, you’ll want to write some code like this:
  func application(_ application: UIApplication, didFinishLaunchingWithOptions
    // ...
    printFCMToken() // This will be nil the first time, but it will give you a value on most subsequent runs
    NotificationCenter.default.addObserver(self,
      selector: #selector(tokenRefreshNotification),
      name: NSNotification.Name.firInstanceIDTokenRefresh,
      object: nil)
    application.registerForRemoteNotifications()
    //...
  }

  func printFCMToken() {
    if let token = FIRInstanceID.instanceID().token() {
      print("Your FCM token is (token)")
    } else {
      print("You don't yet have an FCM token.")
    }
  }

  func tokenRefreshNotification(_ notification: NSNotification?) {
    if let updatedToken = FIRInstanceID.instanceID().token() {
      printFCMToken()
      // Do other work here like sending the FCM token to your server
    } else {
      print("We don't have an FCM token yet")
    }
  }
The very first time your app runs, you’ll see a message that you don’t have an FCM token, followed by a message a short time later with your actual token. In subsequent runs, you should see your cached token right away. It’s a 153-character random string that looks a lot like your server key, so don’t get ’em confused.
So, now that you have both pieces of information, you can make a curl call. Try calling something like this:
> curl --header "Content-Type: application/json"
--header "Authorization: key=AU...the rest of your server key...s38txvmxME-W1N4"
https://fcm.googleapis.com/fcm/send
-d '{"notification": {"body": "Hello from curl via FCM!", "sound": "default"},
"priority": "high",
"to": "gJHcrfzW2Y:APA91...the rest of your FCM token...-JgS70Jm"}'
If all has gone well, you’ll see a notification on your device, as well as receive a “Success” response from FCM.
{"multicast_id":86655058283942579,"success":1,"failure":0,"canonical_ids":0,"results":[{"message_id":"0:1486683492595106961%9e7ad9838bdea651f9"}]}Don’t get too excited by this success response. That just means FCM has successfully received your message; it doesn’t mean that it has successfully delivered it to APNs. You really want to look for the notification on your device.
If your notification doesn’t seem to be getting received, here’s a few things to look out for:
-
Are you seeing an error message in your response? Don’t ignore those. They’re usually pretty big hints as to what’s going on.
-
InvalidRegistrationmeans you don’t have the correct FCM device token. (Remember, it’s actually called a “registration token”) -
A 401 error with the message “The request’s Authentification (Server-) Key contained an invalid or malformed FCM-Token” means the server key is probably incorrect. Make sure you’ve copied the whole thing correctly from the Firebase console.
-
Is your
priorityset tohigh? Android and iOS devices have different interpretations of medium and high priority values. -
On Android, medium priority basically means, “Send the message, but be respectful of your user’s device if it’s in doze mode”. This is generally why FCM uses “medium” as its default priority if you don’t specify one.
-
On iOS, medium (or 5) priority can best be summarized as, “Maybe we’ll send it at some point. But in this crazy world of ours, who can say for sure?!? ¯\_(ツ)_/¯”.
-
This is why APNs defaults to a priority value of 10 (or “high”) when no priority value is specified and they really only ask you to send messages medium priority when you’re sending a data-only
content-availablemessage. -
Ideally, you should send most user-visible messages with medium priority to Android devices and high priority to iOS devices. If you’re using the Firebase Notifications panel, you can do this pretty easily.
-
Are you using APNs syntax instead of FCM syntax? While FCM will properly translate FCM-speak to APNs, it will get confused if you send it APNs syntax in the first place. So double-check that you’re sending messages properly formatted for FCM. In particular, confirm that you’re setting “priority” to “high” and not “10”.
-
If you’re sending a content available message, make sure you’re specifying
"content_available": truewith an underscore and not"content-available":2 -
I also recommend trying to send a Notification through the Firebase Notifications panel at this point. If you can make a call through Notifications but not through a curl call, it might be a sign that your message isn’t properly formatted.
-
Have you uploaded your APNs certificate to the Firebase console? And has it expired? Remember, FCM needs that certificate in order to communicate with APNs.
6. Make a call through the Notifications panel and/or your server
So if you’ve gotten to this point, we’ve basically established that the path from FCM to APNs to iOS to your app is working correctly. So I would be very surprised if the Notifications panel wasn’t working at this point. If it is, the best thing to do is check status.firebase.google.com and see if there are any issues with the Cloud Messaging service. (This also includes the Notifications panel)
If the problem is with your server code, well… that’s up to you and your server. But now that you’ve figured out exactly what data you need to generate to make a proper FCM call, I’m hoping you can tackle this part on your own with confidence. Or, at least, the appearance of confidence, which is enough to fool most people.
That’s all!
Whew! Well, I know that was a lot to go through, and hopefully you were able to stop at, like, step 2 because it turns out you forgot to flip some switch in your Xcode project. If that’s the case, you’re probably not even reading this conclusion. Come to think of it, if you made it this far, it’s probably because you’re still having problems with your implementation, in which case… uh… go check out our support channels. Or ask @lmoroney, because I’m basically out of suggestions at this point.
Thanks for reading!
[1] That’s an NSNotification, not an APNs notification. Hooray for overloaded terms!
[2] One interesting error I ran into was a developer who couldn’t understand why his content-available messages were only being received when his app was in the foreground. It turns out he had explicitly connected to FCM (like in step 1) and was using the (invalid) "content-available" key in his message. Since FCM didn’t translate this into a valid APNs content-available message, it interpreted it as a data-only message that should only be sent over FCM, which is why it only worked when his app was in the foreground.