


This article is part of the weekly learning pathways we’re releasing leading up to Firebase Summit. See the full pathway and register for the summit here.
Earlier this year at Google I/O, we announced Firebase App Check, Firebase’s new platform for protecting your Firebase APIs from abuse. Not only can App Check protect hosted APIs (such as Cloud Storage for Firebase, Firebase Realtime Database, and others), it can also be used to protect your own backend resources, whether they are run in a managed environment such as Cloud Run or hosted on your own infrastructure.
To prevent abuse, your public APIs should verify that the calling application is authorized to make requests, regardless of whether a user credential is present or not. Imagine you run a backend which provides the API for a free mobile app; your app might be funded with ads, so you should ensure that all requests originate from your app—and not someone else’s app!
To protect your backend with App Check, your apps should send an App Check token with every request. Apps built with Firebase SDKs and with App Check functionalities properly configured will automatically obtain and refresh App Check tokens for you. They will also automatically send those tokens along with every request to supported Firebase services such as Cloud Storage for Firebase, Cloud Functions for Firebase, and Firebase Realtime Database. These services will also automatically verify those tokens for you.
On the other hand, if you run your services on your own infrastructure, you are responsible for making sure that:
- Your apps send an App Check token with every request to your services. Learn how to do this for your Android, iOS, and web apps.
- Your services validate App Check tokens in your backend code. In this blog post, we’re going to show you how to do this in several different contexts.
Verifying App Check tokens in a Node.js backend
In Node.js backends running in trusted environments, such as Cloud Run, Cloud Functions, or your own server, it is common practice to use middleware modules to integrate cross-cutting concerns like this. Here’s a code snippet that defines an Express.js middleware layer that verifies the App Check token using the Firebase Admin SDK:
const express = require('express');
const firebaseAdmin = require('firebase-admin');

const app = express();
firebaseAdmin.initializeApp();

const appCheckVerification = async (req, res, next) => {
  const appCheckClaims =
    await verifyAppCheckToken(req.header('X-Firebase-AppCheck'));
  if (!appCheckClaims) {
    res.status(401);
    return next('Unauthorized');
  }
  next();
};

const verifyAppCheckToken = async (appCheckToken) => {
  if (!appCheckToken) {
    return null;
  }
  try {
    return firebaseAdmin.appCheck().verifyToken(appCheckToken);
  } catch (err) {
    return null;
  }
};

app.get('/yourApiEndpoint', [appCheckVerification], (req, res) => {
  // Handle request.
});
For more details, check out our documentation.
Verifying App Check tokens in other backend resources
App Check tokens are implemented as JSON Web Tokens (JWT) as specified by RFC 7519. This means they are signed JSON objects. To assert that an App Check token is legitimate, you must perform the following steps:
- Obtain the Firebase App Check public JSON Web Key (JWK) Set (as specified by RFC 7517) from our JWKS endpoint (
https://firebaseappcheck.googleapis.com/v1beta/jwks). - Verify the App Check token’s signature to ensure it is legitimate.
- Ensure that the token’s header uses the algorithm
RS256. - Ensure that the token’s header has type
JWT. - Ensure that the token is issued by Firebase App Check under your project.
- Ensure that the token has not expired.
- Ensure that the token’s audience matches your project.
- If desired, you can also check that the token’s subject matches your app’s App ID.
The following example performs the necessary steps in Ruby using the jwt gem as a Rack middleware layer. Many languages have similar JSON Object Signing and Encryption (JOSE) libraries that you can use for this purpose.
require 'json'
require 'jwt'
require 'net/http'
require 'uri'

class AppCheckVerification
  def initialize(app, options = {})
    @app = app
    @project_number = options[:project_number]
  end

  def call(env)
    app_id = verify(env['HTTP_X_FIREBASE_APPCHECK'])
    return [401, { 'Content-Type' => 'text/plain' }, ['Unauthenticated']] unless app_id
    env['firebase.app'] = app_id
    @app.call(env)
  end

  def verify(token)
    return unless token

    # 1. Obtain the Firebase App Check Public Keys
    # Note: It is not recommended to hard code these keys as they rotate,
    # but you should cache them for up to 6 hours.
    uri = URI('https://firebaseappcheck.googleapis.com/v1beta/jwks')
    jwks = JSON(Net::HTTP.get(uri))

    # 2. Verify the signature on the App Check token
    payload, header = JWT.decode(token, nil, true, jwks: jwks, algorithms: 'RS256')

    # 3. Ensure the token's header uses the algorithm RS256
    return unless header['alg'] == 'RS256'

    # 4. Ensure the token's header has type JWT
    return unless header['typ'] == 'JWT'

    # 5. Ensure the token is issued by App Check
    return unless payload['iss'] == "https://firebaseappcheck.googleapis.com/#{@project_number}"

    # 6. Ensure the token is not expired
    return unless payload['exp'] > Time.new.to_i

    # 7. Ensure the token's audience matches your project
    return unless payload['aud'].include? "projects/#{@project_number}"

    # 8. The token's subject will be the app ID, you may optionally filter against
    # an allow list
    payload['sub']
  rescue
  end
end

class Application
 def call(env)
    [200, { 'Content-Type' => 'text/plain' }, ["Hello app #{env['firebase.app']}"]]
  end
end

use AppCheckVerification, project_number: 1234567890
run Application.new
Verifying App Check tokens at the edge
If your application uses content delivery networks (CDNs) to cache content closer to your users, you can use App Check to filter out abusive traffic at the edge. Since the Firebase Admin SDK’s App Check functionalities are currently only available in Node.js and not all CDN providers support the Node.js runtime, you may need to verify App Check tokens in another runtime supported by the CDN. For this use case, you can adapt the following example for CloudFlare workers:
import { JWK, JWS } from "node-jose";

// Specify your project number to ensure only your apps make requests to your CDN
const PROJECT_NUMBER = 1234567890;

addEventListener("fetch", event => {
  event.respondWith(handleRequest(event.request))
});

async function handleRequest(request) {
  const appCheckToken = request.headers.get('X-Firebase-AppCheck');
  const appId = await verifyAppCheckToken(appCheckToken);
  if (!appId) {
    return new Response("Unauthorized", { status: 401 });
  }


  return new Response(`Hello app ${appId}`, {
    headers: { "content-type": "text/plain" }
  });
}

async function verifyAppCheckToken(encodedToken) {
  if (!encodedToken) {
    return null;
  }

  // 1. Obtain the Firebase App Check Public Keys
  // Note: It is not recommended to hard code these keys as they rotate,
  // but you should cache them for up to 6 hours.
  const jwks = await fetch("https://firebaseappcheck.googleapis.com/v1beta/jwks", {
    headers: {
      "content-type": "application/json;charset=UTF-8",
    }
  });

  // 2. Verify the signature on the App Check token
  const keystore = await JWK.asKeyStore(await jwks.json());
  const token = await JWS.createVerify(keystore).verify(encodedToken);

  // 3. Ensure the token's header uses the algorithm RS256
  if (token.header["alg"] !== "RS256") {
    return null;
  }

  // 4. Ensure the token's header has type JWT
  if (token.header["typ"] !== "JWT") {
    return null;
  }

  const payload = JSON.parse(token.payload.toString());

  // 5. Ensure the token is issued by App Check
  if (payload["iss"] !== `https://firebaseappcheck.googleapis.com/${PROJECT_NUMBER}`) {
    return null;
  }

  // 6. Ensure the token is not expired
  if (Date.now() > payload["exp"] * 1000) {
    return null;
  }

  // 7. Ensure the token's audience matches your project
  if (!payload["aud"].includes(`projects/${PROJECT_NUMBER}`)) {
    return null;
  }

  // 8. The token's subject will be the app ID, you may optionally filter against
  // an allow list
  return payload["sub"];
}
Verifying App Check tokens in Apigee
Apigee is Google Cloud’s comprehensive API management platform for your APIs. In Apigee, you can easily implement a policy for your API Proxy that checks for the presence and validity of Firebase App Check tokens for all your incoming requests.
In the following example, we will check for the presence of the Firebase App Check token in the request header X-Firebase-AppCheck, ensure that it is valid, and verify that it was issued by the correct project.
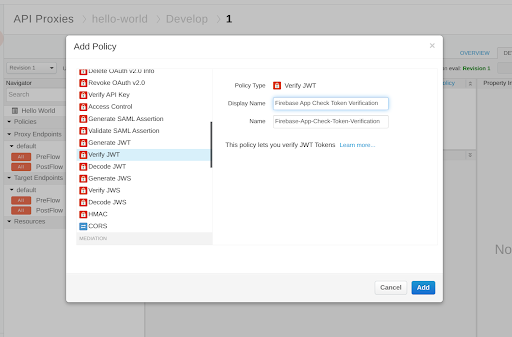
First, in your API Proxy, add a Verify JWT policy; you can enter any Display Name.
Similar to the examples we have seen so far, you will need to perform all of the following steps in this policy:
- Extract the Firebase App Check token from the client request; we highly recommend passing it as a header, such as
X-Firebase-AppCheck, and userequest.headers.X-Firebase-AppCheckas the<Source>. - Provide our Public JWKS (as specified by RFC 7517) endpoint:
https://firebaseappcheck.googleapis.com/v1beta/jwks. - Ensure that the
<Algorithm>is set toRS256. - Ensure that the
<Audience>containsprojects/{project_number}. Here, the{project_number}is the project number of your Firebase project that issued the Firebase App Check token (without the braces). - Ensure that the
<Issuer>is equal tohttps://firebaseappcheck.googleapis.com/{project_number}; again, ensure that the{project_number}is the Firebase project that issued the Firebase App Check token (without the braces). - If desired, you can also check that the
<Subject>matches your app’s App ID.
Following these steps, your configuration should look like the following:
<?xml version="1.0" encoding="UTF-8" standalone="yes"?>
<VerifyJWT continueOnError="false" enabled="true"
        name="Firebase-App-Check-Token-Verification">
    <DisplayName>Firebase App Check Token Verification</DisplayName>
    <Algorithm>RS256</Algorithm>
    <Source>request.headers.X-Firebase-AppCheck</Source>
    <PublicKey>
       <JWKS uri="https://firebaseappcheck.googleapis.com/v1beta/jwks"/>
    </PublicKey>
    <!-- Be sure to use your real project number in <Issuer> and <Audience>. -->
    <Issuer>https://firebaseappcheck.googleapis.com/123456789</Issuer>
    <Audience>projects/123456789</Audience>
    <!-- You can also optionally check that the Subject matches your app's App Id. -->
    <Subject><!-- Insert your app's App ID here. --></Subject>
</VerifyJWT>
Finally, add this policy to your Proxy Endpoint’s pre-flow, and save this configuration as a new revision. Once you re-deploy the proxy at this revision, any request that arrives at the proxy must have a valid Firebase App Check token in the X-Firebase-AppCheck header, or the request will be rejected.
Conclusion
Securing your app and your resources is critical. Using Firebase Authentication and Firebase Security Rules helps protect access to user data, and using Firebase App Check helps mitigate fraud and secure access to your backend resources—whether those are Firebase resources or your own. View the full learning pathway on protecting your app from abuse for additional resources.
And don’t forget to register for Firebase Summit and join us on November 10th to learn how Firebase can help you accelerate your app development, release with confidence and scale with ease!