
This is the second part of a series of articles that dive into creating a new Android application from scratch using Jetpack Compose for the user interface and some other tools offered by Google, like Firebase Authentication, Crashlytics, Cloud Firestore, Performance Monitoring, Remote Config, Firebase Extensions, Firebase Cloud Messaging and Hilt.
Part 1 has an overview of what you can do with this app, how it is structured and what technologies we will be covering in this series. In this second part we will look at implementing the login and sign up flows and how the ViewModel connects the business logic with the composable functions. We will also cover how to add Firebase Authentication to the project.
Authentication flow
Firebase Authentication
To implement the user authentication flow, we will use a Firebase product called Authentication, that allows you to securely authenticate users to your application. It supports authentication using passwords, phone numbers and some popular federated identity providers like Google, Facebook, Twitter, Github and more.
One of the most interesting features of Firebase Authentication is Anonymous Authentication, which allows you to create an anonymous session for a user, without having to ask for any information from them. Later it is possible to upgrade an anonymous user account by asking the user to authenticate using one of the other providers, and linking their credentials to the existing (anonymous) account.
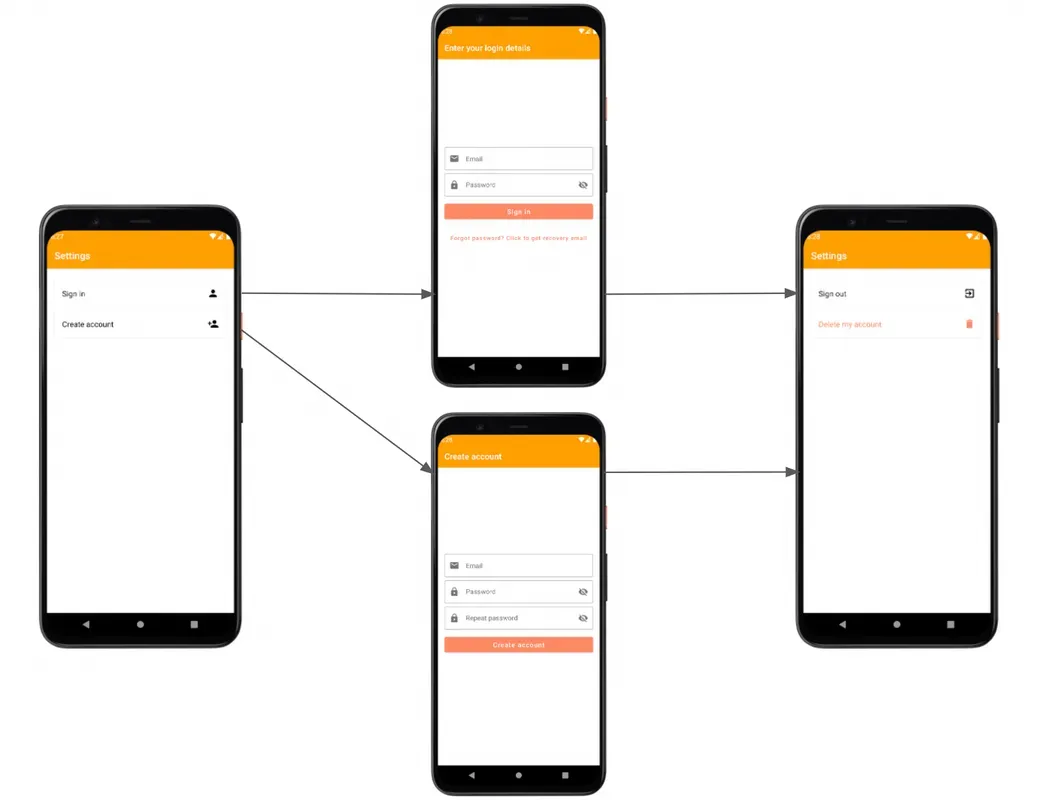
Launching the app for the first time
Nobody likes having to create a new account before they can try out a new app. To give users the best possible experience, we want to enable them to start using the app without having to sign in first. We are going to use Anonymous Authentication to achieve this.
Anonymous Authentication can be very useful in a situation like this, where we want to enable the user to have their data protected by security rules from the beginning. As soon as the app starts, we will start an anonymous session and display the TasksScreen, allowing the user to create to-do items and edit them.
Adding an account
Once the user has used the app for a bit and has come to the conclusion that they like it, we want to give them the chance to upgrade to a full account that is linked to a sign-in they can use on other devices as well. The user can do this by navigating to the settings screen and choosing to either sign in or create an account.
On this screen, the user will have two options: login or create a new account using the email and password authentication method. At this point, the previously created anonymous account will be linked to these new credentials. This means that Firebase will never create a second account for the user.
Depending on the user’s authentication state, the settings screen will show different options. If the user navigates to the settings screen while signed in, two new options are going to be available: it’s possible to sign out only, or to delete the account, which will cause all the to-do items to be deleted.
Implementing the Authentication flow
Adding Firebase to your project
To implement the authentication flow we just saw above, we will use Firebase Authentication. First we need to add the Firebase SDK (Software Development Kit) to the Android project. To do so, we need to add the Make It So Android application to the Make It So Firebase project in the Firebase Console. Once we are done creating the project, we will be able to download a configuration file that we’ll add to the project. This configuration file contains all the information that the Firebase SDK for Android needs to connect to the Firebase project. All these instructions are detailed in the official Firebase documentation.
After we add the SDK to the project, we can add the dependency for the Firebase Authentication library to the app/build.gradle file:
dependencies {
    // Import the BoM for the Firebase platform
    implementation platform('com.google.firebase:firebase-bom:31.0.0')

    // Declare the dependency for the Firebase Authentication library
    implementation 'com.google.firebase:firebase-auth-ktx'
}
Authentication in Compose
Before we talk about using authentication in Compose, let’s remember how Firebase Authentication works with an Activity. If you look at the documentation for Android, you’ll find a step-by-step guide that shows how to create an instance of FirebaseAuth that will be initialized later using the onCreate method.
private lateinit var auth: FirebaseAuth

override fun onCreate() {
    super.onCreate()
    auth = Firebase.auth
}
In our case, we will only use the Activity to create the first composable function, called MakeItSoApp. The Activity and the composable functions should know nothing about the business logic and the APIs that the ViewModels will use, so this is how the MakeItSoActivity will look like:
class MakeItSoActivity : AppCompatActivity() {
    override fun onCreate(savedInstanceState: Bundle?) {
        super.onCreate(savedInstanceState)

        setContent { MakeItSoApp() }
    }
}
This is the MakeItSoApp method we see above:
fun MakeItSoApp() {
    MakeItSoTheme {
        Surface(color = MaterialTheme.colors.background) {

            val appState = rememberAppState()

            Scaffold(
                [...]
                scaffoldState = appState.scaffoldState
            ) {
           [...]
            }
        }
    }
}
This is the top level composable function of the app, where we will keep a reference to the state of the application so that we can observe the changes and recompose the screens as necessary. This is also where we apply the Make It So theme (which will define which colors are used in Dark mode and Light mode) and add the Scaffold in which all screens will be shown. Scaffold is a composable that provides slots for many different components and screen elements - this is useful for defining the general structure of a screen.
Creating the View Model
To prevent the composable functions from knowing anything about the business logic, we are going to call the Firebase Authentication API methods from the ViewModels. But to do that, we first need to get the data the user entered in the TextFields of the screens, so that we can pass it as parameters to the authentication methods.
Let’s see how this works in the LoginScreen. This screen has quite a few pieces of data that need to be synchronized with the ViewModel (the email and password Strings). We will wrap this information in a data class to make it easier to handle:
data class LoginUiState(
    val email: String = "",
    val password: String = ""
)
Inside the LoginViewModel we are going to create a mutableState corresponding to the state in which the screen is:
var uiState = mutableStateOf(LoginUiState())
        private set
Only the ViewModel can post new values for this mutableState. The LoginScreen will only be able to observe these new states and react to them.
@Composable
fun LoginScreen(popUpScreen: () -> Unit, viewModel: LoginViewModel = hiltViewModel()) {
    val uiState by viewModel.uiState

    BasicToolbar(AppText.login_details)

    Column([...]) {
        EmailField(uiState.email, viewModel::onEmailChange, Modifier.fieldModifier())

        [...]
    }
}
We can see in the snippet above that we are sharing the uiState.email with the EmailField composable. Let’s see what this composable function does:
@Composable
fun EmailField(value: String,  onNewValue: (String) -> Unit, modifier: Modifier = Modifier) {
    OutlinedTextField(
        singleLine = true,
        modifier = modifier,
        value = value,
        onValueChange = { onNewValue(it) },
        placeholder = { Text(stringResource(AppText.email)) },
        leadingIcon = { [...] }
    )
}
We initialize the EmailField with the value emitted by the ViewModel. Every time this field is updated by the user (by typing something), we send the new value to the onNewValue callback which is passed to the composable function as a parameter.
In the LoginScreen composable that we see above, we can see that this callback passes the newly typed email for the ViewModel (viewModel::onEmailChange), and the ViewModel then posts the new email value to the uiState:
fun onEmailChange(newValue: String) {
    uiState.value = uiState.value.copy(email = newValue)
}
Once the ViewModel emits the new state, the composable function will notice that the state has been updated and will automatically update itself through a process called recomposition. Then the new email value will be reflected in the UI (the content inside the EmailField will be updated).
This is how we make sure that both ViewModel and composable function will always have the most up-to-date uiState, and as soon as the user clicks the sign in button, the ViewModel will get the most recent values for email and password and send it as a parameter to the methods of the service.
Creating the Account Service
The next step is to create the AccountService, using the service interface and implementation pattern that we saw earlier in part 1 of this series. It’s the full responsibility of the ViewModel to call the service methods, based on the user’s interactions with the buttons on the screen. We are going to use callbacks to get the responses from calls made to the Firebase Authentication API. This is what the interface will look like:
interface AccountService {
    fun createAnonymousAccount(onResult: (Throwable?) -> Unit)
    fun authenticate(email: String, password: String, onResult: (Throwable?) -> Unit)
    fun linkAccount(email: String, password: String, onResult: (Throwable?) -> Unit)
}
We need to implement these methods in the AccountServiceImpl class. Here we can see another difference in the way we used the Authentication API before. Previously, we had to call these methods directly from the Activity, so we had a context to attach to our listeners:
auth.signInWithEmailAndPassword(email, password)
        .addOnCompleteListener(this) { task ->
            if (task.isSuccessful) {
                updateUI(auth.currentUser)
            } else {
                updateUI(null)
            }
        }
Now, we won’t call these methods from the Activity any longer, so we won’t have the auth instance already initialized, and we won’t have a context to attach to the listeners. We can get around this by using a listener that doesn’t require any context. Also, note that we can use the Firebase.auth instance in the implementation of the service, without having to initialize it before.
override fun createAnonymousAccount(onResult: (Throwable?) -> Unit) {
    Firebase.auth.signInAnonymously()
        .addOnCompleteListener { onResult(it.exception) }
 }

override fun authenticate(email: String, password: String, onResult: (Throwable?) -> Unit) {
    Firebase.auth.signInWithEmailAndPassword(email, password)
        .addOnCompleteListener { onResult(it.exception) }
 }

override fun linkAccount(email: String, password: String, onResult: (Throwable?) -> Unit) {
    val credential = EmailAuthProvider.getCredential(email, password)

    Firebase.auth.currentUser!!.linkWithCredential(credential)
        .addOnCompleteListener { onResult(it.exception) }
}
Now we just need to call these methods from the ViewModels, passing the callback as a parameter. Here is an example of the linkAccount method being called from the SignUpViewModel:
accountService.linkAccount(email, password) { error ->
    if (error == null) {
        openAndPopUp(SETTINGS_SCREEN, SIGN_UP_SCREEN)
    } else onError(error)
}
This method is called when the user wants to create a new account. We get the email and password entered by the user and pass both as parameters to the EmailAuthProvider.getCredential method. This method will return the new credential that we will use when calling the linkWithCredential method from the Firebase API.
Updating the Composable Screen
Next let’s analyze what happens inside the callback method. Upon returning from a successful account creation, we proceed to the next step, which is to call the method openAndPopUp. This method will reopen SettingsScreen and remove the current SignUpScreen from the top. Once we return to the SettingsScreen, the SettingsUiState is updated with the new value for the isAnonymousAccount property.
@Composable
fun SettingsScreen(
    openLogin: () -> Unit,
    openSignUp: () -> Unit,
    restartApp: () -> Unit,
    modifier: Modifier = Modifier,
    viewModel: SettingsViewModel = hiltViewModel()
) {
    val uiState by viewModel.uiState

    Column(
        modifier = modifier
            .fillMaxWidth()
            .fillMaxHeight()
            .verticalScroll(rememberScrollState())
    ) {
        [...]

        if (uiState.isAnonymousAccount) {
            RegularCardEditor(AppText.sign_in, Modifier.card()) {
                openLogin()
            }

            RegularCardEditor(AppText.create_account, Modifier.card()) {
                openSignUp()
            }
        } else {
            SignOutCard { viewModel.onSignOutClick(restartApp) }
            DeleteMyAccountCard { viewModel.onDeleteMyAccountClick(restartApp) }
        }
    }
}
As the account we are using is no longer an anonymous account, the composable function will recompose itself and update the content shown to the user, displaying the SignOutCard and the DeleteMyAccountCard instead of the Sign In and Create Account cards. This way, the UI reflects the user’s authentication state, allowing them to either sign out or delete their account should they wish to.
What’s next
In part 3 of this series, we will learn about Crashlytics, and how it can help you improve the quality of your app. We will also look into how to display messages on snackbars and some improvements we can make to avoid duplicated code.
The source code for Make it So for Android is available in this Github repository - all the code you saw in this article is available in the v1 folder.
This article shows how to use callbacks to pass results between Services and ViewModels, but this pattern is used only in a specific version of the Make it So app. Therefore, you must checkout the v1.0.0 tag if you want to have access to this code specifically. A more recent version uses Kotlin Coroutines and Kotlin Flow instead of callbacks (see part 5 of this series to understand how this change affects the Services shown in this article).
If you’re also interested in iOS/Mac development, the same application is available for these platforms as well. The iOS/Mac version uses SwiftUI for building the User Interface, which is very similar to how we build UIs in Compose. You can find the source code in this Github repository.
If you have any questions or suggestions, feel free to reach out to us on the discussions page of the repository.