
So you’ve deployed your first Firebase web app, and it’s working great. But working great doesn’t mean it’s secure. When I built my first Firebase web app, 3 important security concepts stood out: Firebase Security Rules, Google Cloud service accounts, and Firebase App Check. These work together to protect your application from bad actors, honest mistakes, and unexpected big bills.
Client access control with security rules
The first layer of security comes from having strict security rules. Security rules control what kind of access different clients have to parts of your application.
Locking down security rules in 3 steps
Securing your security rules comes down to 3 steps that can be repeated indefinitely as your security rules evolve:
- Narrowly identifying the target resource: what is the resource you want to protect?
- Narrowly identifying the allowed operations: what kind of access do you want to delegate?
- Narrowly identifying the principal client: who do you want to delegate this access to?
For example, let’s start with the default security rules provided when a Cloud Firestore database is created in production mode:
rules_version = '2';

service cloud.firestore {
  match /databases/{database}/documents {
    match /{document=**} {
      allow read, write: if false;
    }
  }
}These rules completely lock down my Cloud Firestore database so that no clients can access it by default. First, I’m going to identify a target resource. My Firebase web app is a simple blog site where each article will be stored in a collection called posts. So my first target resource is any document in the posts collection:
rules_version = '2';
service cloud.firestore {
  match /databases/{database}/documents {
    match /posts/{postId} {
      allow read, write: if false;
    }
  }
}The original rules used {document=**} for matching all collections and documents in my Cloud Firestore database. I replaced this wildcard with a hard-coded collection name /posts/{postId}. This way, if I decide later on to create a new collection in my Cloud Firestore, no access will be granted via any security rules I’m using now.
I can narrow down my target resource further by specifying a field for documents in the posts collection. My database will include articles published and articles still in draft, specified by the status field in a document. To create a security rule for only published articles I add a condition:
rules_version = '2';
service cloud.firestore {
  match /databases/{database}/documents {
    match /posts/{postId} {
      allow read, write: if false && resource.data.status == "published";
    }
  }
}Next, I want to narrowly identify the operations allowed for my target resource. They are get for single-document read requests and list for queries and collection read requests:
rules_version = '2';
service cloud.firestore {
  match /databases/{database}/documents {
    match /posts/{postId} {
      allow get, list: if false && resource.data.status == "published";
    }
  }
}Together the get and list operations make up read which can be used in place of the two individual operations, but I like separating them out so I can easily tell exactly what I’m allowing with this rule. Now, finally, I can decide who gets to read articles by identifying a principal client: everyone. I can do that by removing the if false condition:
rules_version = '2';
service cloud.firestore {
  match /databases/{database}/documents {
    match /posts/{postId} {
      allow get, list: if resource.data.status == "published";
    }
  }
}With these security rules, only articles with the status published can be retrieved when content is dynamically generated in my app. All others with a status like draft will be inaccessible. Keep in mind that the query in my application code will still need to satisfy the rule’s condition by including a where("status", "==", "published") clause. That’s because security rules are not filters. Cloud Firestore evaluates the query against its potential result set and not the actual field values for all documents to save time and resources.
Since I want my web app to include an admin view where I can manage my content, I need to include another rule that grants write access to clients authenticated as me. Here’s what I end up with after going through my 3 lock down steps:
rules_version = '2';
service cloud.firestore {
  match /databases/{database}/documents {
    match /posts/{postId} {
      allow get, list: if resource.data.status == "published";
      allow create, update, delete : if isAdmin();
    }
  }
}

function isAdmin() {
  return request.auth != null &&
         request.auth.token.firebase.sign_in_provider == 'google.com' &&
         request.auth.token.email == "myemail@gmail.com";
}The target resource is narrowed down to all documents in my posts collection, so my allow line is nested below the same match line as before. The allowed operations I want are create, update, and delete. Similar to how get and list can be replaced with read, these 3 operations can be replaced with write. And finally, the client principal is defined very narrowly as a single admin user, which is identified using a helper function isAdmin() that checks the authentication details from the request. For this to work, I enabled Firebase Authentication with the Google provider and added my user. Using a helper function like this is a great way to separate the logic for identifying a principal from the logic that governs the level of access, and is especially valuable as security rules become more complex.
System access control with service accounts
Firebase Security Rules are great for validating the requests coming in from clients, but these rules don’t apply to server-to-server operations that happen behind the scenes. For me, this security boundary became apparent when I deployed a Cloud Function that I wanted to programmatically read and write to my Cloud Firestore database. Since this is a background operation running in a trusted environment within my Firebase project, securing it required pivoting away from defining security rules for clients and instead identifying the appropriate IAM roles for the service identity that executes the Cloud Function.
There are 3 kinds of service identities that are used to run backend operations that should be understood:
- Default service accounts: Identities automatically created by Google Cloud when you enable certain APIs like Compute Engine and App Engine.
- User-managed service accounts: Custom identities created and managed by administrators on a Cloud project. When created, these have zero permissions by default, letting you define its access control from the ground up.
- Service agents: Google-managed accounts that run silently in the background. Firebase uses several service agents to operate Google Cloud resources, however, Firebase documentation refers to some of them as service accounts.
When developing your backend, it’s a good idea to replace default service accounts, like the Compute Engine Service Account, with custom user-managed service accounts when possible so that you can enforce a policy of least privilege. This means that an account is only granted the permissions it needs to operate successfully, and nothing more.
Cloud Functions and the default service account
I wanted my Cloud Function to automatically publish articles on my blog by regularly checking my Cloud Firestore collection for any posts with “scheduled” as the status field and a past date in the toBePublished field:
const {onSchedule} = require("firebase-functions/scheduler");
const {initializeApp} = require("firebase-admin/app");
const {getFirestore} = require("firebase-admin/firestore");

initializeApp();
const db = getFirestore("techblog");

exports.publishScheduledPosts = onSchedule("every 5 minutes", async () => {
  const snapshot = await db.collection("posts")
    .where("status", "==", "scheduled")
    .where("toBePublished", "<=", new Date())
    .get();

  const updates = snapshot.docs.map((doc) =>
    doc.ref.update({status: "published", publishedAt: new Date()}),
  );

  await Promise.all(updates);
});After deploying with firebase deploy --only functions it worked as expected, but there is an opportunity to improve security: my Function is running using the Compute Engine default service account. This service account is automatically added to a project when the Compute Engine API is enabled and has broad project-wide permissions (the Editor role).
By default, a Cloud Function will run using the overly permissive Compute Engine default service account. Similar to how wide-open security rules are convenient when getting started with Cloud Firestore or Storage, a Cloud Function running with this default service account is beneficial for temporarily avoiding issues having to do with permissions on the project’s resources. However, just like how security rules should be narrowly defined, a Cloud Function’s service account should be replaced with a user-managed service account restricted to only the permissions it needs to complete its operations.
You can check the default service account of a Cloud Function with the following gcloud command:
gcloud functions --project <PROJECT_ID> describe <FUNCTION_NAME> | grep serviceAccountEmailIf the email in the output matches the standard Compute Engine service account format PROJECT_NUMBER-compute@developer.gserviceaccount.com then it’s likely that your Function is running with overly permissive access to your project.
The least privilege solution
Tightening up a Cloud Function’s permission comes down to 3 steps:
- Creating a new service account
- Assigning the IAM permissions
- Redeploying the Cloud Function with the service account specified
The first two steps can be completed in the Google Cloud console by following the steps on the IAM & Admin Create Service Accounts page. After providing a service account name and creating it in your project, you can grant permissions via one or more IAM roles. In my case, my Cloud Function just needs to be able to access my Cloud Firestore database with read and write permissions, so the only role I need to grant is the Cloud Datastore User role. You can search and view all available IAM roles on the IAM & Admin Roles page in the Google Cloud console or check out a list in the Firebase documentation.
Once the service account is created and permissions are granted, the Cloud Function should be updated with the following addition to specify a service account by email:
const {onSchedule} = require("firebase-functions/scheduler");
const {initializeApp} = require("firebase-admin/app");
const {getFirestore} = require("firebase-admin/firestore");
const {setGlobalOptions} = require("firebase-functions");

setGlobalOptions({
  serviceAccount: "your-service-account@your-project-id.iam.gserviceaccount.com",
});

initializeApp();
const db = getFirestore("techblog");

exports.publishScheduledPosts = onSchedule("every 5 minutes", async () => {
  const snapshot = await db.collection("posts")
    .where("status", "==", "scheduled")
    .where("toBePublished", "<=", new Date())
    .get();

  const updates = snapshot.docs.map((doc) =>
    doc.ref.update({status: "published", publishedAt: new Date()}),
  );

  await Promise.all(updates);
});By specifying a service account in setGlobalOptions, it will be used by all functions exported from this file. A service account can be specified on a per-function basis by providing the parameter to the exported Firebase Functions method.
Redeploying with firebase deploy --only functions updates the Cloud Run Function and corresponding Cloud Scheduler job to ditch the Compute Engine default service account for the more securely configured user-managed service account. As I continue to develop my Cloud Function, any functionality I add that would require additional access to Google Cloud resources will need to be explicitly allowed via updates to my service account’s granted IAM roles.
Application Verification with Firebase App Check
Let’s talk about the client again. While security rules with Firebase Authentication can verify who the user is, it cannot verify what is making the request. With access to your app’s Firebase config object, a malicious bot can circumvent your app and make direct API requests. This is where App Check comes in. App Check works by leveraging attestation providers like Play Integrity for Android apps, DeviceCheck or App Attest for iOS, and reCAPTCHA for Web apps to verify the source of each client request. By ensuring that the source is verified, App Check is able to protect your Firebase project from unauthorized requests and the associated unexpected billing spikes they could cause.
Enabling App Check during local development
In the case of my blog, a web app, my attestation provider of choice would be reCAPTCHA. However,
App Check can be set up before deployment, without setting up reCAPTCHA. While developing your app, you can lock down your application so that it only works from your local development environment or CI pipeline by generating a debug token that gets added to your App Check config in the Firebase console. After that, enforcement can be enabled on a service-by-service basis without the need for an attestation provider. The unique debug token serves as the attestation and an attestation provider can be configured later on.
For my web app, I wanted to enforce App Check specifically for my Cloud Firestore where the client retrieves the contents of my blog. The first step is to add the App Check initialization to my application code, right after initializing Firebase:
// App Check imports
import { initializeAppCheck, ReCaptchaV3Provider } from "firebase/app-check";

// Initialize Firebase
const app = initializeApp(firebaseConfig);

// Initialize App Check
initializeAppCheck(app, {
  provider: new ReCaptchaV3Provider('none'), // required but can be left empty until deployment
  isTokenAutoRefreshEnabled: true
});The second parameter passed to the initializeAppCheck() method includes App Check options that require a provider to be defined. At this point, since I haven’t deployed my app yet, I’m able to pass it a placeholder value for now that I can update later when I register my site with reCAPTCHA. With this change, a local instance of my app still works as normal.
The next step is to enforce App Check on your Firebase project by selecting APIs in the Firebase console App Check page:
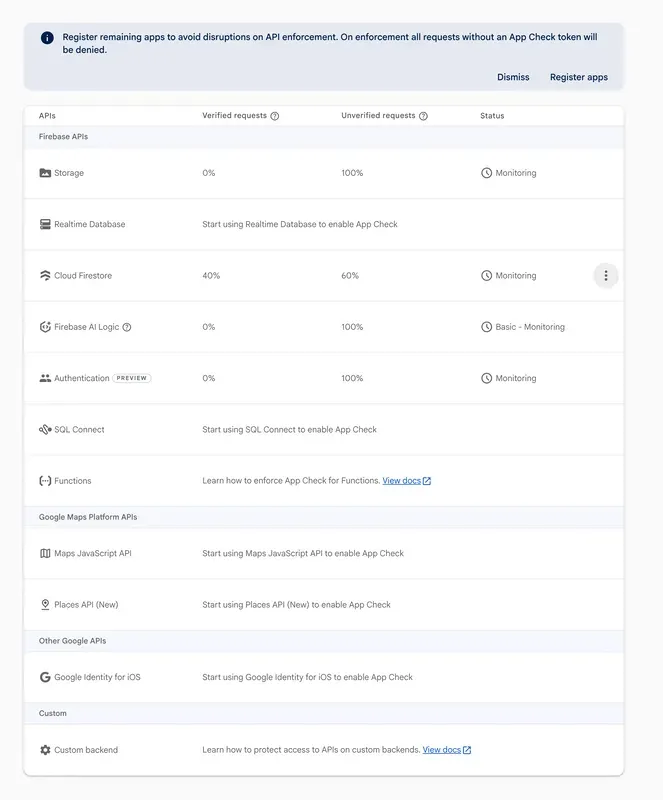
After clicking enforce for Cloud Firestore, error messages associated with bad requests and missing or insufficient permissions begin appearing in my application’s error logs on any page that sends requests to Cloud Firestore. This is a sign that App Check is working.
Now, I need to update App Check to make an exception for my development environment and avoid these errors. That’s where a debug token comes in. When the environment variable FIREBASE_APPCHECK_DEBUG_TOKEN is set to true in my application’s environment, a debug token is generated:
// Initialize Firebase
const app = initializeApp(firebaseConfig);
(self as any).FIREBASE_APPCHECK_DEBUG_TOKEN = true;

// Initialize App Check
initializeAppCheck(app, {
  provider: new ReCaptchaV3Provider('none'), // required but can be left empty until deployment
  isTokenAutoRefreshEnabled: true
});With this variable set, when I start my application and open it up in my preferred browser, I’ll see an App Check entry in the console log:

This is the debug token that will attest that my browser is authorized to access my protected Cloud Firestore. The final step is to go to the App Check page in the Firebase console and find my app under the Apps tab:
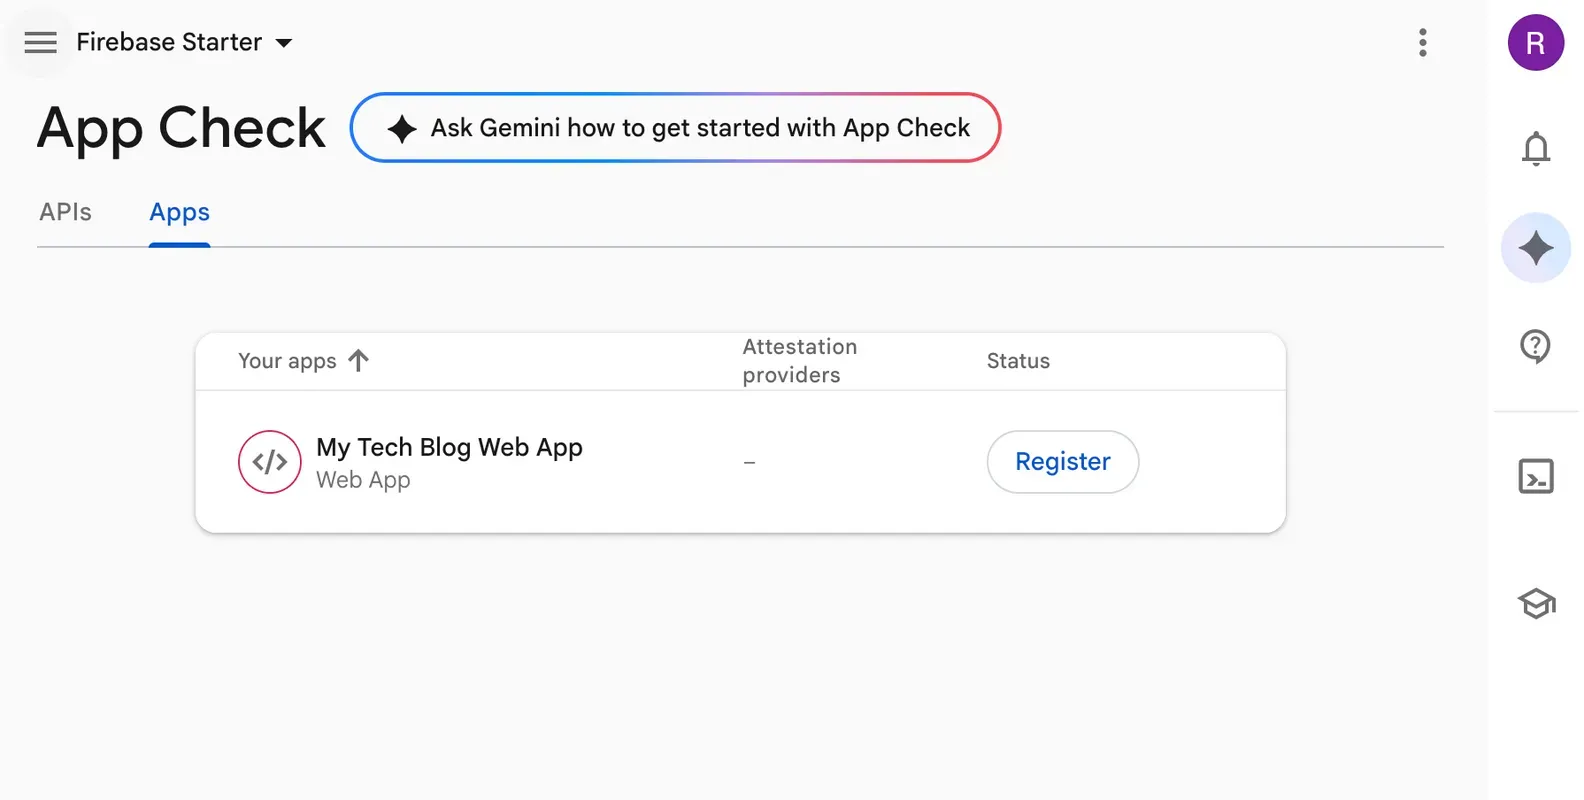
For now I can ignore the option to Register and instead, I can click the 3 dot menu and select Manage debug tokens. Here I can add the debug token I generated in my application console log. Since I’m using different browsers in my local development, I generated a debug token for each one:
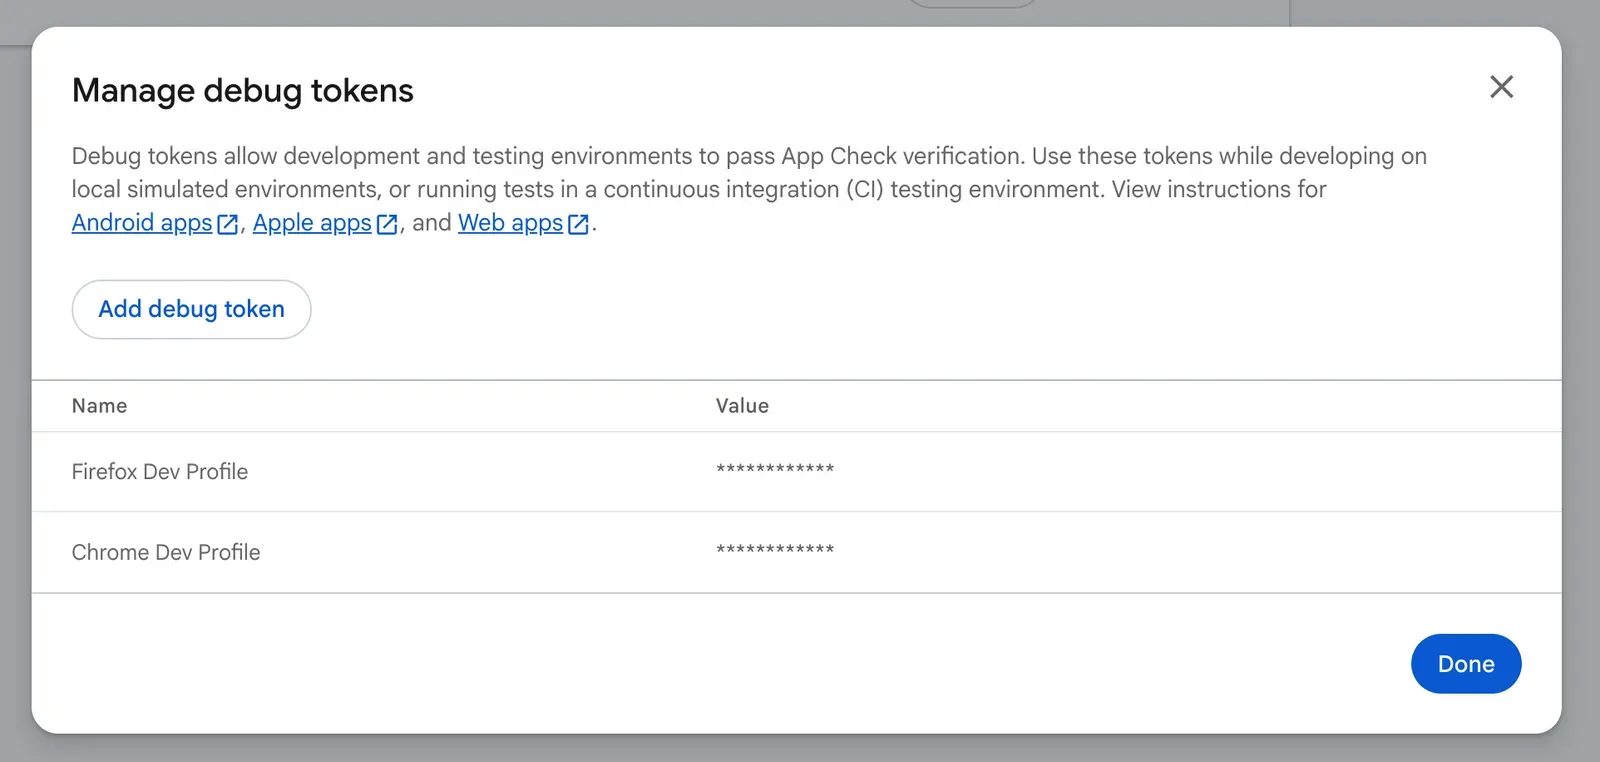
With my debug tokens added, my web app is now free of any permission and access errors. I can also remove the environment variable line added to my code. My debug token will be used indefinitely and I’ll only need to generate and register a new one if I clear my browser’s cache, run my application from an incognito or private browser window, use a different browser, or if I run my app on a different port.
Conclusion
Building my first Firebase web app gave me the opportunity to learn about the different ways to think about security. Developing a broad understanding of Firebase Security Rules, permissions for user-managed service accounts, and configuring Firebase App Check helps to build a well-rounded foundation for a security-first approach for building with Firebase. The robust triple-layer defense lets me control client-side access, enforce a policy of least privilege on my backend, and verify the integrity of incoming requests. This layered approach protects my app from bad actors and mistakes.
As you build and scale out your own Firebase web apps, take the time to apply this triple-layer security mental model to ensure your application remains secure, too.