
This is the seventh part of a series of articles that dive into creating a new Android application from scratch using Jetpack Compose for the user interface and some other tools offered by Google, like Firebase Authentication, Crashlytics, Cloud Firestore, Performance Monitoring, Remote Config, Firebase Extensions, Firebase Cloud Messaging and Hilt.
Part 1 of this series has an overview of how this app is structured. Part 2 shows how to implement login and sign up flows using Firebase Authentication. Part 3 covers how to add Firebase Crashlytics to handle errors. Part 4 covers how to store data in the cloud using Cloud Firestore. Part 5 shows how to add Kotlin Coroutines and Kotlin Flow and Part 6 covers how to improve the app’s quality with Firebase Performance Monitoring.
In this seventh part, we show you how to control the behavior and appearance of your application remotely using Firebase Remote Config, without having to ask users to download and install a new version of your application.
Firebase Remote Config
What is it?
Firebase Remote Config is a cloud service that lets you change the behavior and appearance of your app without requiring users to download an app update. You do that by creating configurations on the Firebase Console, which can be of different types (Strings, numbers, Booleans or JSONs) and making your codebase react to these configurations. Then, when you want to change the behavior of your app, all you have to do is update the value on the Remote Config dashboard and publish it, and your app should react to the new value in the next app launch.
You can also add different targeting criteria, or conditions, to each new value that you publish for a configuration. For example, if you plan to perform a staged rollout of a new feature, you can define the percentage of users who will receive the new value to monitor the rollout before releasing it to all of your users. You can combine Firebase Remote Config with Analytics to target specific audiences, or assign different values to different countries. The list of what we can do with Remote Config is huge, so let’s check some real life examples.
What can I use it for?
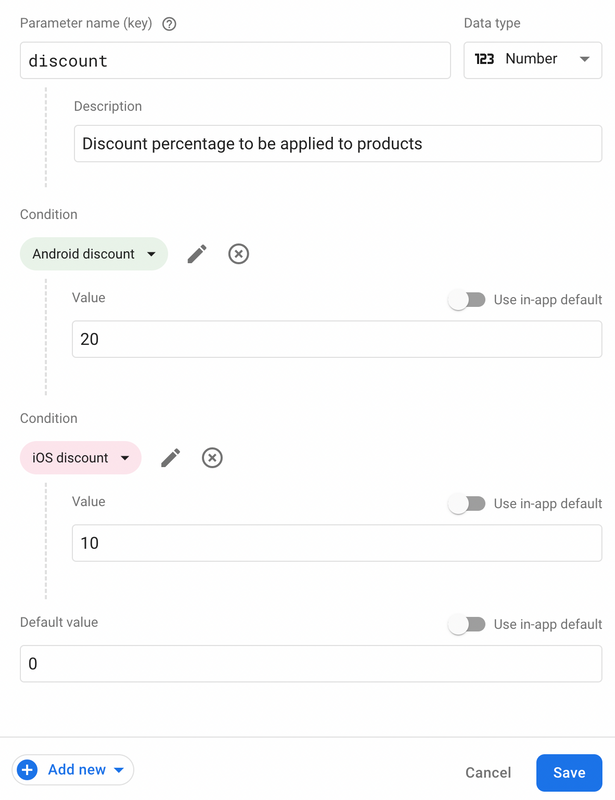
Let’s say you want to show a different URL to users in the USA and users in the UK. To accomplish this, you can create a String parameter with a default value (for users in neither country) and two conditions with different values: one for users in the United Kingdom, and one for users in the United States. Now imagine that you want to drive Android adoption by offering more discounts on products for Android users than for iOS users. You can create a Number parameter and add two conditions: one that provides a 20% discount for Android users and one that provides 10% discount to iOS users, as seen below:
Remote Config can also help you in times of crisis! Suppose you enable a new feature in your app and your Crashlytics dashboard starts to log a lot of new crashes! If this feature is hidden behind a feature toggle (or feature flag), which is basically a boolean configuration in the Remote Config dashboard, you can simply disable this feature by changing the parameter value to “false” and publishing the changes to your users.
As you can see, Remote Config can be useful for lots of different scenarios, and for this article specifically, we are going to cover how you can use it as a feature toggle that hides or shows the “edit to-do item” feature in the Make it So app.
Adding Remote Config to your app
Adding the SDK
To use Remote Config, you first need to import the library to the app/build.gradle file:
dependencies {
    // Import the BoM for the Firebase platform
    implementation platform('com.google.firebase:firebase-bom:31.1.0')

    // Declare the dependency for Remote Config and Analytics libraries
    implementation 'com.google.firebase:firebase-config-ktx'
    implementation 'com.google.firebase:firebase-analytics-ktx'
}
Creating the configuration
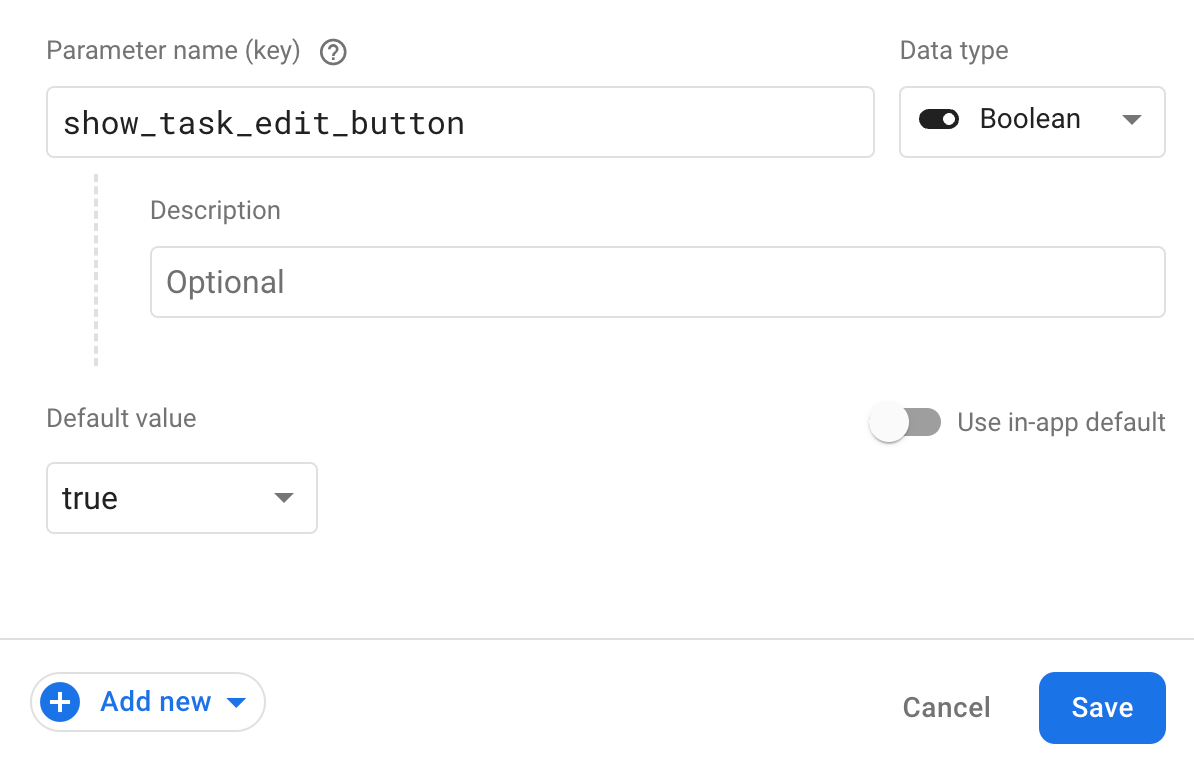
The first thing we need to do is create the parameter in the Firebase console. You can do this by navigating to the Remote Config dashboard, under the Build or Engage sections of the console, and clicking the “Add parameter” button. As we are creating a feature toggle, the value of this parameter must be a boolean (true if the feature should be shown to the user, false if not):
Setting up your app
The Remote Config API uses a minimum fetch interval to control how often your app requests new values from the Remote Config server. If we try to fetch before this minimum interval has elapsed, the API will not return a new value, and your app will use the cached value. By default, this is set to 12 hours, but we can change this in our app – especially during development, when we know we’ll need to fetch the values several times to make sure that we configured our application correctly and that the integration with Remote Config is working as expected.
Because of this, the first piece of code we will add to Make it So will decrease the minimumFetchIntervalInSeconds to 0 after ConfigurationServiceImpl is initialized, as you can see below. Note that this code is wrapped inside an if condition that checks if the app is in debug mode, because short intervals should only be configured for testing:
init {
  if (BuildConfig.DEBUG) {
    val configSettings = remoteConfigSettings {
        minimumFetchIntervalInSeconds = 0
    }
    remoteConfig.setConfigSettingsAsync(configSettings)
  }

 [...]
}
If you need to fetch the new values in smaller time intervals than the 12-hour default, you can also change the minimum fetch interval in your production app. However, be sure to keep in mind that excessive API usage is not recommended, and you should only change the minimum interval if it’s really necessary for your application’s scope.
Using the configuration in your app
Fetching the keys
Now that the minimum interval is set while the app is in debug mode, we can add the code to fetch the parameter values and apply it to our UI. The first method below, called fetchConfiguration, is called as soon as the app starts (at the launch of the SplashViewModel - the first ViewModel to be created in Make it So), and is responsible for fetching the most updated values so they are available for all app screens.
It is very important to fetch the most updated values as soon as the application is launched – in the first few frames – to ensure that your users have a good experience. Especially if the value toggles the visibility of a feature, as we are implementing here. We want to ensure that this feature will not disappear while the user is looking at the screen, or even using it.
override suspend fun fetchConfiguration(): Boolean =
  trace(FETCH_CONFIG_TRACE) {
    remoteConfig.fetchAndActivate().await()
  }

override val showTaskEditButtonConfig: Boolean
  get() = remoteConfig[SHOW_TASK_EDIT_BUTTON_KEY].asBoolean()
The second method we see above just returns the boolean value for the parameter named show_task_edit_button. This value will be used on the TasksScreen, where we see the to-do list, and must be retrieved by TasksViewModel right in the initialization block, as seen below:
fun loadTaskOptions() {
  val hasEditOption = configurationService.showTaskEditButtonConfig
  options.value = TaskActionOption.getOptions(hasEditOption)
}
The code above is using the value of the feature toggle to retrieve which options will be available for each task in the to-do list. The user will have the option to edit the task if the value of the parameter is true.
Applying the new values to the screen
Now that the TasksViewModel has the list of options available for the tasks, we can use this information in the TasksScreen through the viewModel.options.value, as seen below:
val options by viewModel.options

LazyColumn {
  items(tasks.value, key = { it.id }) { taskItem ->
    TaskItem(
      task = taskItem,
      options = options,
      [...]
    )
  }
}
In the code above, we pass the list of options into the composable function called TaskItem. This composable function declares what the UI of each item should look like, and what options will be available in the menu when the user clicks on the three-dot menu available for each task.
Once you add all the code shown above, your app should be ready to run and fetch the most up to date values from Remote Config. If you run Make it So with the feature toggle set to true in the Firebase console, you should be able to click the three dot icon and edit the task. And if you change the feature toggle to false in the Firebase console and reopen the app, you should no longer see the edit task option.
What’s next
In part 8 of this series, we’ll show you how Firebase Extensions work and how you can use one of them to delete the user’s data when they delete their account from Firebase Authentication.
You can clone the source code on the Github repository - all the code you saw in this article is available in the v1 folder. If you’re also interested in iOS/Mac development, the same application is available for these platforms as well. The iOS/Mac version uses SwiftUI for building the user interface, which also follows the declarative UI model, similarly to how we build UIs in Compose. You can find the source code in this Github repository.
If you have any questions or suggestions, feel free to reach out to us on the discussions page of the repository.