
This is the fourth part of a series of articles that dive into creating a new Android application from scratch using Jetpack Compose for the user interface and some other tools offered by Google, like Firebase Authentication, Crashlytics, Cloud Firestore, Performance Monitoring, Remote Config, Firebase Extensions, Firebase Cloud Messaging and Hilt.
Part 1 of this series has an overview of what you can do with this app and how it is structured. Part 2 shows how to implement login and sign up flows using Firebase Authentication. Part 3 covers how to add Firebase Crashlytics to handle crashes and display messages to the user.
In this fourth part, we will learn about Cloud Firestore, check how to add it to the application and start using it to store the to-do items in the cloud. We will also cover how to listen to changes on the stored items and update the UI based on these events - being able to sync data in real time is one of Firestore’s most exciting features!
Creating and editing tasks
Tasks screen flow
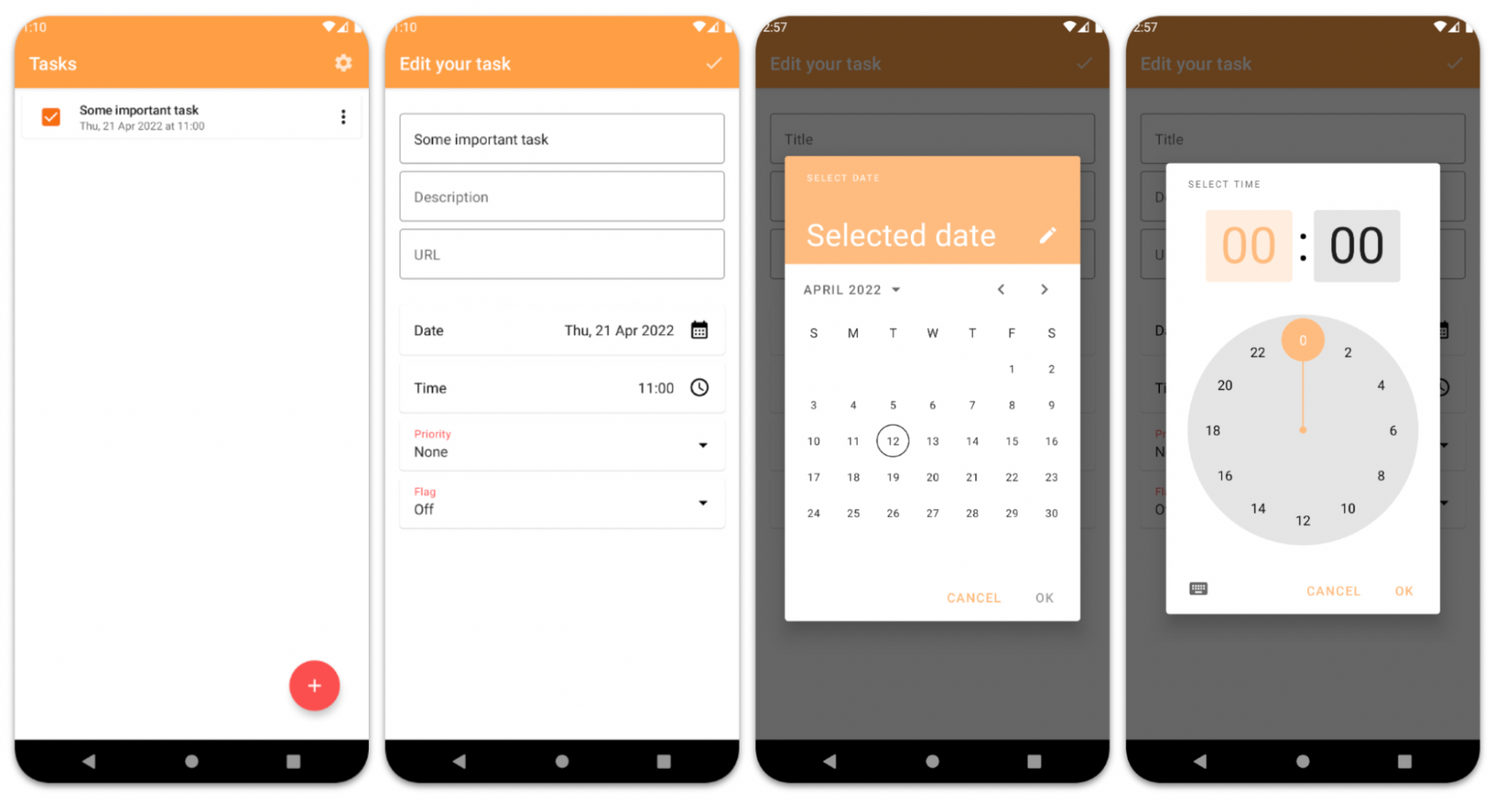
Before diving into the code, let’s check the tasks screen (shown in the first screenshot below) flow. From this screen we can perform the following actions:
- Create a new task: This can be done by tapping the add button in the lower right corner. The user is then redirected to the task editing screen, where they can create a new task. All the fields will be initialized with default values.
- Expand the task menu: Each task has a three dots menu that displays three options when the user taps on it:
- Edit task: Opens the same task editing screen mentioned above, but with the values of the chosen item, instead of the default values of an empty task.
- Toggle flag: Changes the state of the flag from on to off and vice versa.
- Delete task: Deletes the task.
- Open the settings screen: It can be accessed by tapping on the gear icon in the upper right corner. The settings screen allows the user to log to an existing account, or create a new account.
Task editing screen flow
The task editing screen is quite simple to understand, as we can see in the second screenshot below. Each task has a title, description and URL that can be entered in the three TextFields shown at the top of the screen. It is also possible to add a due date and time for each task by tapping on the Date and Time options and selecting the values using the calendar and the clock, as seen in screenshots three and four.
Lastly, it is possible to change the priority and flag status. Each task is initialized with the default priority None, but it is possible to change it to Low, Medium or High. As for the flag, the initial value is Off, but it is possible to change it to On. Once the user finishes configuring the task, they can tap on the confirmation icon in the upper right corner of the screen.
Cloud Firestore
What is Cloud Firestore?
Cloud Firestore is a NoSQL cloud database, which means that the way of storing information is different from a SQL database. Instead of using tables and columns, the information is stored in collections and documents, which have a very JSON-like structure (each document contains fields mapping to values).
These fields within documents can be of different types (String, Integer, Array, Date and even references to other documents), allowing us to choose the data structure that works best for our application. Documents are stored in collections. To retrieve data, we can either fetch individual documents, or query a collection for multiple documents that match the query criteria.
Cloud Firestore also allows us to keep the application data synchronized across different platforms and devices through realtime listeners, which we will talk about further in this article. You can find out more about these and many other benefits in the official documentation.
Adding Cloud Firestore to your project
To add Cloud Firestore to an Android project, add the following dependencies to your app/build.gradle file:
dependencies {
    // Import the BoM for the Firebase platform
    implementation platform('com.google.firebase:firebase-bom:31.0.0')

    // Declare the dependency for the Firestore library
    implementation 'com.google.firebase:firebase-firestore-ktx'
}
Don’t forget to create a Cloud Firestore database for your project in the Firebase Console, so we can connect to this database in our code. Go to the Firestore Database section in the console and click “Create Firestore database”. For more details about the setup flow, check out the official Get Started documentation.
Creating the Storage Service
The next step is to create the StorageService, using the service interface and implementation pattern that we saw earlier in part 1 of this series. This is what the interface will look like:
interface StorageService {
    fun addListener(
        userId: String,
        onDocumentEvent: (Boolean, Task) -> Unit,
        onError: (Throwable) -> Unit
    )

    fun removeListener()
    fun getTask(taskId: String, onError: (Throwable) -> Unit, onSuccess: (Task) -> Unit)
    fun saveTask(task: Task, onResult: (Throwable?) -> Unit)
    fun updateTask(task: Task, onResult: (Throwable?) -> Unit)
    fun deleteTask(taskId: String, onResult: (Throwable?) -> Unit)
}
We have methods to register and unregister a listener that should listen to events in the collection of documents we want to observe. The other methods are for retrieving, saving, updating and deleting items. As we can see above, documents are being represented by a data structure called Task. This is what this data class looks like:
data class Task(
    val id: String = "",
    val title: String = "",
    val priority: String = "",
    val dueDate: String = "",
    val dueTime: String = "",
    val description: String = "",
    val url: String = "",
    val flag: Boolean = false,
    val completed: Boolean = false,
    val userId: String = ""
)
In addition to all the information that is shown to the user, each item also has the userId (so that we can fetch tasks based on the user who has logged into the application) and an id that is auto generated by Firestore when we create the document. The latter is necessary as the LazyColumn (the UI element used to display lists in Compose) requires that each item has a unique key.
Implementing the tasks screen flow
Adding listeners
We want to be able to show live data. So whenever the user makes a change to their list of tasks on a different device, we want all their other devices to show the same data. Firestore provides a mechanism called snapshot listeners which allows us to implement this with a few lines of code.
However, we need to make sure this snapshot listener adheres to the screen lifecycle. If the screen is not visible, it doesn’t make sense to receive events. This is why we need to register the listener when the view appears, and unregister it when the view disappears. To achieve this we will add a DisposableEffect in the top level composable function. This is what we should use for side effects that need to be cleaned up (like registering and unregistering listeners, which is exactly the case).
DisposableEffect(viewModel) {
    viewModel.addListener()
    onDispose { viewModel.removeListener() }
}
Even though the add and remove methods are below each other in the snippet above, they will not be executed sequentially. The addListener method will be called as soon as the composable function starts, and the removeListener method will be called as soon as the function is disposed of.
These addListener and removeListener methods in the TasksViewModel will call the StorageService passing the callback that should be executed whenever a document event is received:
fun addListener() {
    viewModelScope.launch(showErrorExceptionHandler) {
        storageService.addListener(accountService.getUserId(), ::onDocumentEvent, ::onError)
    }
}

fun removeListener() {
    viewModelScope.launch(showErrorExceptionHandler) { storageService.removeListener() }
}
We will implement the methods of the service interface in the StorageServiceImpl class:
override fun addListener(
    userId: String,
    onDocumentEvent: (Boolean, Task) -> Unit,
    onError: (Throwable) -> Unit
) {
    val query = Firebase.firestore.collection(TASK_COLLECTION).whereEqualTo(USER_ID, userId)

    listenerRegistration = query.addSnapshotListener { value, error ->
        if (error != null) {
            onError(error)
            return@addSnapshotListener
        }

        value?.documentChanges?.forEach {
            val wasDocumentDeleted = it.type == REMOVED
            val task = it.document.toObject<Task>().copy(id = it.document.id)
            onDocumentEvent(wasDocumentDeleted, task)
        }
    }
}

override fun removeListener() {
    listenerRegistration?.remove()
}
The listenerRegistration is an object of the service implementation that holds a reference to the snapshotListener. We are keeping this reference so we can unregister it when necessary. Inside the forEach block we are checking each document event to see if the change is of type REMOVED, so we can call the onDocumentEvent callback passing this boolean as a parameter.
In addition to the boolean parameter, we also have a Task parameter that we need to send, as the TasksViewModel needs to know exactly which of the tasks has been modified in order to apply the necessary changes on the tasks list. We can use the toObject method provided by the API to map the document to an object that our codebase recognizes (in this case, a Task). We will talk about mapping later in this article.
Calling service methods from ViewModel
It is also the responsibility of the TasksViewModel to update the Task in Firestore when the user marks and unmarks it as complete or when the flag status changes. The same thing happens when the user taps to delete an item in the context menu: the TasksViewModel is responsible for calling the deleteTask method from the service.
After calling the service methods there are two things that can happen: in case of an error, we will receive an Exception in our callback and we will call the onError method, as we can see in the code snippet below. This onError method uses Crashlytics to log the error, as previously discussed in part 3 of this series. If successful, the document will be updated in the Firestore collection and we will receive an event through the registered listener to update the local list.
private fun onDeleteTaskClick(task: Task) {
    viewModelScope.launch(showErrorExceptionHandler) {
        storageService.deleteTask(task.id) { error ->
            if (error != null) onError(error)
        }
    }
}
Updating the composable screen
For the to-do list screen we don’t need to create a UiState to exchange information between the TasksViewModel and the TasksScreen, since the only thing we need to look at is a list of Tasks. Instead of using a MutableState, as we have seen on other screens, we will use a MutableStateMap:
var tasks = mutableStateMapOf<String, Task>()
    private set
We are going to use the id of the task as a key to the map, and store the task as the value for that key. This allows us to access and make changes to the items very quickly, based on their unique ids. For example, this is all the TasksViewModel does when it listens to a document event:
private fun onDocumentEvent(wasDocumentDeleted: Boolean, task: Task) {
    if (wasDocumentDeleted) tasks.remove(task.id) else tasks[task.id] = task
}
Then the composable function observing this map will recompose itself and show the updated items:
LazyColumn {
    items(viewModel.tasks.values.toList(), key = { it.id }) { item ->
        [...]
    }
}
Implementing the task editing screen flow
Calling service methods from ViewModel
There are three StorageService methods that we can call in the EditTaskViewModel. The first one is called getTask and receives the taskId as a parameter. With this id we can retrieve the Task that must be edited on this screen. If no id is sent as a parameter, we show the screen with empty fields, allowing the user to create a new Task from scratch.
The second and third methods that we are going to use are called saveTask (used to create new tasks) and updateTask (used to update tasks that already exist):
fun onDoneClick(popUpScreen: () -> Unit) {
    viewModelScope.launch(showErrorExceptionHandler) {
        val editedTask = task.value.copy(userId = accountService.getUserId())

        if (editedTask.id.isBlank()) saveTask(editedTask, popUpScreen)
        else updateTask(editedTask, popUpScreen)
    }
}

private fun saveTask(task: Task, popUpScreen: () -> Unit) {
    storageService.saveTask(task) { error ->
        if (error == null) popUpScreen() else onError(error)
    }
}

private fun updateTask(task: Task, popUpScreen: () -> Unit) {
    storageService.updateTask(task) { error ->
        if (error == null) popUpScreen() else onError(error)
    }
}
The onDoneClick method is called when the user taps on the button to save the Task. Inside this method we check whether the Task already exists or not (by checking if the id is blank), to decide whether to call the method to save or update the Task. Again, two things can happen when any of these service methods is called: in case of an error, we will receive an Exception in the callback and we will call the onError method. If successful, we will close the EditTaskScreen and redirect the user back to the TasksScreen, where they can see the updated list.
Keep in mind that the TasksViewModel has registered to listen for changes in the collection, so as soon as we save the Task in the EditTaskViewModel, an event will be sent by Firestore with this update and the TasksViewModel will update its own tasks list automatically.
Saving a Task
As we saw above, as soon as the user clicks on the save button, the composable function calls the onDoneClick method from EditTaskViewModel, and inside this method we can call saveTask or updateTask from StorageService. The saveTask method only adds the Task to the collection (then Firestore will automatically generate an id for this document) and the updateTask method uses the Task id to locate this document in Firestore and update it with the new values:
override fun saveTask(task: Task, onResult: (Throwable?) -> Unit) {
    Firebase.firestore
        .collection(TASK_COLLECTION)
        .add(task)
        .addOnCompleteListener { onResult(it.exception) }
}
override fun updateTask(task: Task, onResult: (Throwable?) -> Unit) {
    Firebase.firestore
        .collection(TASK_COLLECTION)
        .document(task.id)
        .set(task)
        .addOnCompleteListener { onResult(it.exception) }
}
Both methods above pass the onResult parameter as a callback to the Firestore API. This callback will be executed as soon as the API method finishes. The only information we need in this callback is whether or not an error occurred during the task saving process, so that we can show the user the error on the screen (similar to how we saw earlier when deleting a task).
You may have noticed that we don’t do any transformation on the Task object before saving it. We can do this because Firestore can automatically transform our data class objects into documents using reflection. It means that you don’t have to serialize or deserialize any object when using Firestore. Not only will this help you avoid writing a lot of boilerplate code, it will also result in more maintainable code.
The same happens when you retrieve a document. Mapping a Firestore document to an object that the application can recognize is very easy, we can just use the toObject method provided by the API and it does the mapping for us. For example, to transform a document that we fetched from Firestore into an object of type Task, this is all we need to do:
val task = document.toObject<Task>()
Once we pass the Task type to the toObject method, it uses reflection to transform the document’s field values into the properties that we saw in the data class Task.
Updating the composable screen
Once again, for the task editing screen we don’t need to create a UiState to exchange information between the EditTaskViewModel and the EditTaskScreen, since the only thing we need to look at is a single Task (the task being created or edited by the user).
var task = mutableStateOf(Task())
    private set
The EditTaskViewModel will update the Task properties as the user edits them on the fields, and with each change our composable function will recompose itself and show the new properties inputted by the user. To better understand how we pass the user inputs to our ViewModels and how they post these new values back to the Screens, take a look at part 2 of this series.
Future improvements
As much as we hope that users will love our apps, sometimes they are not convinced and would like to delete their account. Due to that and to be compliant with local regulations, we should provide a way for the users to delete all of their data.
You might consider adding a method to the StorageService that deletes all data by going through all of the user’s documents one by one. The method might look like this:
// DO NOT USE THIS - ANTIPATTERN!
override fun deleteAllForUser(userId: String, onResult: (Throwable?) -> Unit) {
    Firebase.firestore
        .collection(TASK_COLLECTION)
        .whereEqualTo(USER_ID, userId)
        .get()
        .addOnFailureListener { error -> onResult(error) }
        .addOnSuccessListener { result ->
            for (document in result) document.reference.delete()
            onResult(null)
        }
}
While this method will work just fine for small sets of data, a couple of things might go wrong, for example: if the internet connection fails while deleting tasks, some documents will not be deleted and will remain in the collection.
Ideally we would leave the action of deleting an account in charge of the backend, so we could call a single method that would take care of batch deleting all the documents once the user deletes their account You can either write your own Cloud Function for this, or save yourself some time and use the Delete User Data Extension. This is something we will be looking into in one of the next installments of this series.
What’s next
The source code for Make it So for Android is available in this Github repository - all the code you saw in this article is available in the v1 folder.
This article shows how to use callbacks to pass results between Services and ViewModels, but this pattern is used only in a specific version of the Make it So app. Therefore, you must checkout the v1.0.0 tag if you want to have access to this code specifically. A more recent version uses Kotlin Coroutines and Kotlin Flow instead of callbacks and modifies the Task model.
If you’re also interested in iOS/Mac development, the same application is available for these platforms as well. The iOS/Mac version uses SwiftUI for building the user interface, which also follows the declarative UI model, similarly to how we build UIs in Compose. You can find the source code in this Github page.
If you have any questions or suggestions, feel free to reach out to us on the discussions page of the repository.