
This is the eighth part of a series of articles that dive into creating a new Android application from scratch using Jetpack Compose for the user interface and some other tools offered by Google, like Firebase Authentication, Crashlytics, Cloud Firestore, Performance Monitoring, Remote Config, Firebase Extensions, Firebase Cloud Messaging and Hilt. If you want to catch up on the series from the beginning, check out these articles:
- Overview of how this app is structured.
- Implement login and sign up flows using Firebase Authentication.
- Add Firebase Crashlytics to handle errors.
- Store data in the cloud using Cloud Firestore.
- Add Kotlin Coroutines and Kotlin Flow.
- Improve the app’s quality with Firebase Performance Monitoring.
- Control app behavior and appearance remotely using Firebase Remote Config.
In this eighth part, you will learn what Firebase Extensions are and how they make it easy for you to add new features to your app with little effort. To give you a better understanding of how Extensions work and how you can use them in your own applications, I am going to show you how to add the Delete User Data Extension to Make It So (the to-do list app we’ve been talking about in this article series), to delete the user’s data when they delete their account.
In one of the previous articles, we implemented deleting the user’s data as a client-side feature, but this has a couple of downsides. For example, what happens if connectivity cuts out? Or, you might have many documents, which would result in a rather long running operation, and we don’t want to keep the user waiting! So in this part of the series, we will fix this by implementing a solution that runs on the backend.
Firebase Extensions
What are Firebase Extensions?
Firebase Extensions are pre-packaged solutions that let you add new capabilities to your apps in a quick and simple way. At Firebase, our goal is to make software development as easy as possible for developers, and Extensions play an important role in this mission as they enable developers to add ready-made solutions for use cases that are commonly found in applications - all without requiring them to write and maintain a lot of code.
What can I use them for?
To better understand what Firebase Extensions can be used for, let’s see an example of a very popular Firebase Extension: the Extension for resizing images. Resizing images is something that is useful in many apps, such as a recipe sharing app that allows users to upload pictures of the recipes they created. Instead of showing those high-resolution images in a grid view, you might want to display thumbnails that are much faster to download, so users who are browsing for inspiration won’t have to wait for all the images to download.
Usually, you would need to implement the code for resizing the images yourself. You would also need to decide where to run this code: on the client or on the server. If you decide to run it on the client, you’ll have to implement it for all of the platforms you support. If you decide to run it on the server, you will have to set up and maintain a server.
With the Resize Images Extension, you don’t have to worry about any of that. All you need to do is install the Extension into your Firebase app, set a couple of configuration options (for example, the desired resolution of the thumbnails, and the image format, such as JPEG, PNG, WebP, GIF, AVIF, or TIFF). The Extension will then automatically resize any image your app uploads to the Cloud Storage bucket you specified.
This is just one example of an Extension that you can use in your applications, but there is much, much more you can do. There are many Firebase Extensions available, covering a wide range of use cases. For a complete list of all the available Extensions, check out the Firebase Extensions Hub. In the following, we will look at how to use a specific Extension, but if you’d like to learn more, check out the official documentation.
Deleting User Data with a Firebase Extension
Make it So is a to-do list app that allows users to sign up for a user account using Firebase Authentication and create tasks that are stored in Cloud Firestore. These tasks are then associated with their user account. For security reasons, users should only ever be able to see their own data. To ensure this, we’ve implemented the app so it only fetches a user’s data and we set up strong Security Rules so they cannot manipulate any data that doesn’t belong to them.
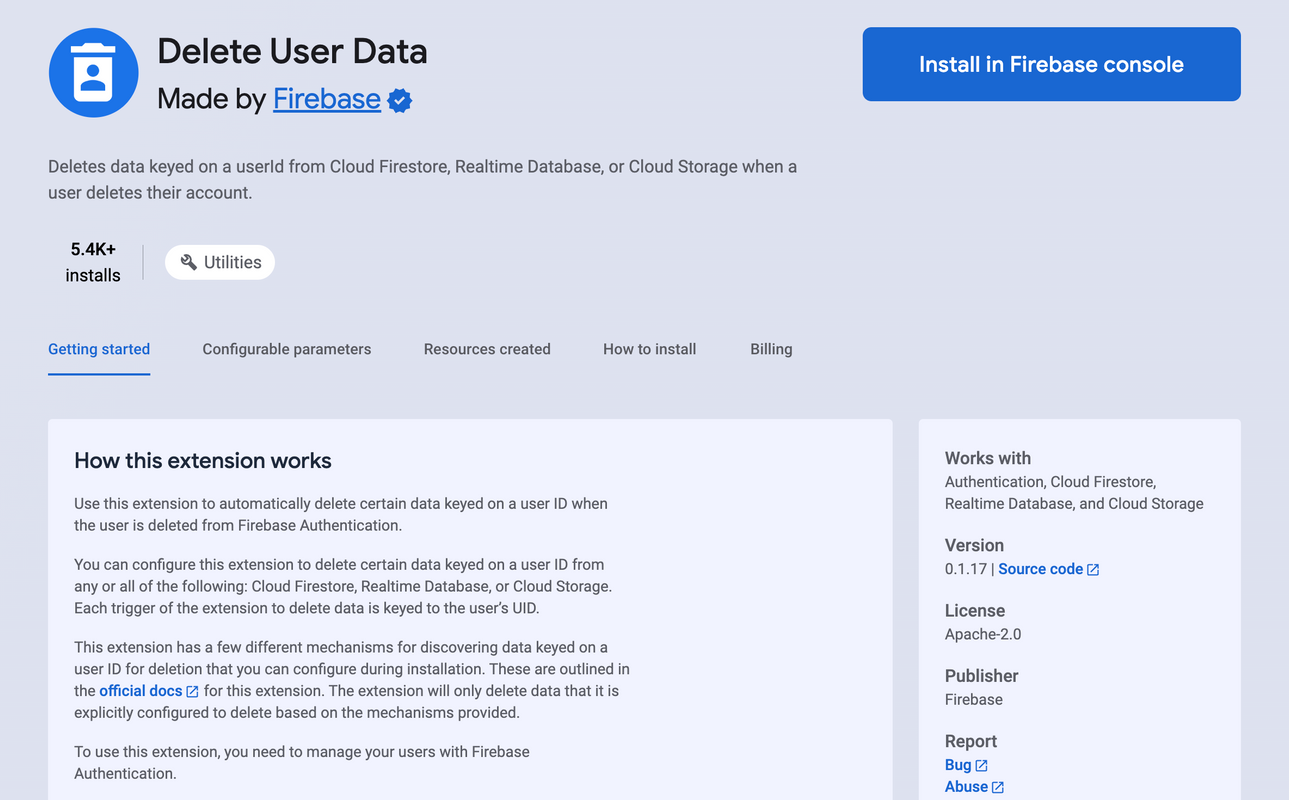
When a user deletes their account, we must also delete their data to comply with regulations and reduce the amount of unused data stored in Cloud Firestore. To do this, we are going to use the Delete User Data Extension. Whenever we delete an user account from Firebase Authentication, it will trigger this Extension and consequently will delete all of the user’s data from Cloud Firestore, Cloud Storage and Realtime Database.
How does it work?
To better understand how the Delete User Data Extension works, consider the data model we chose for storing our users’ tasks:
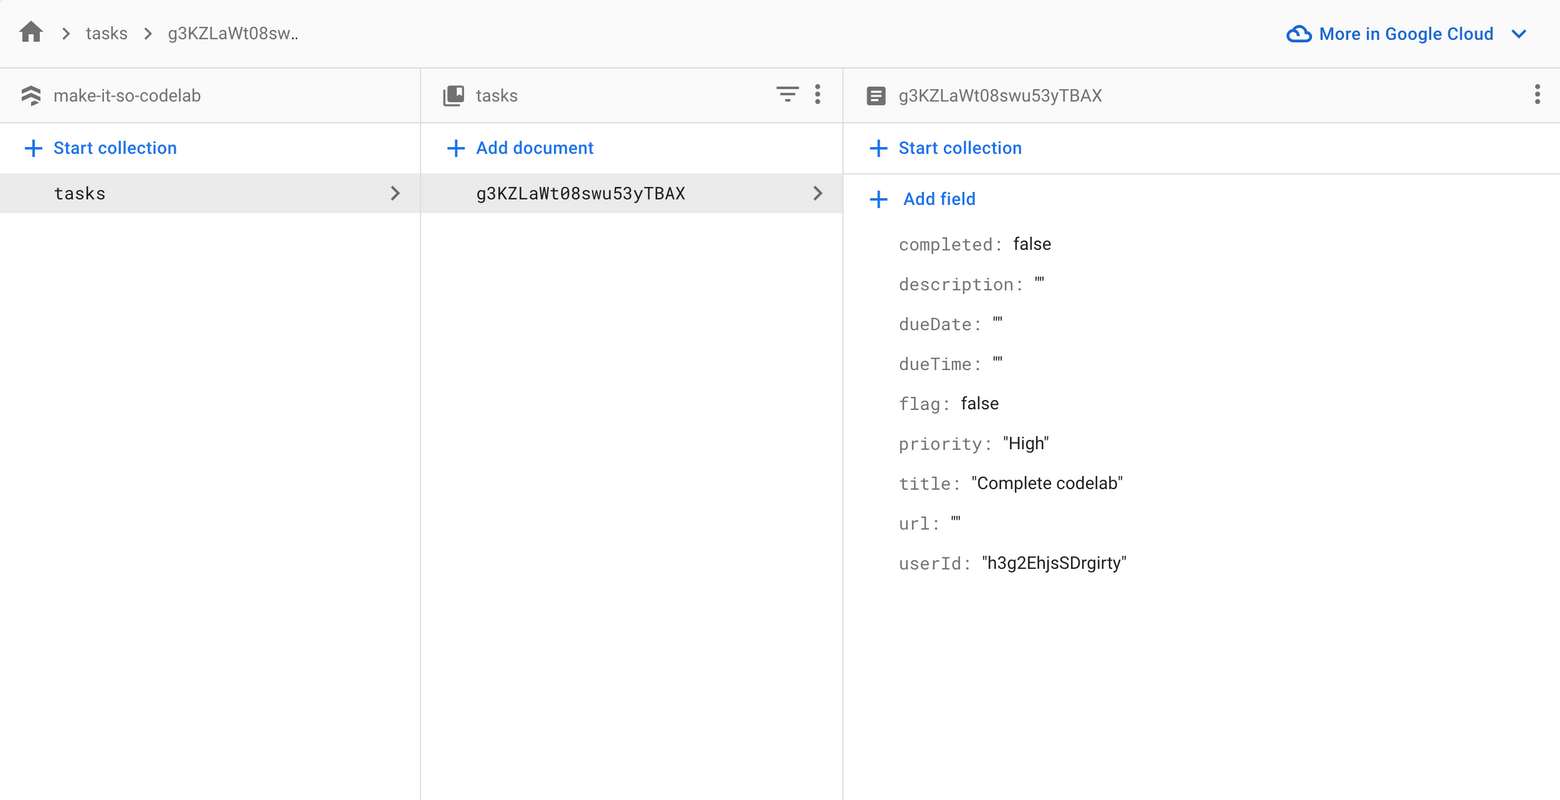
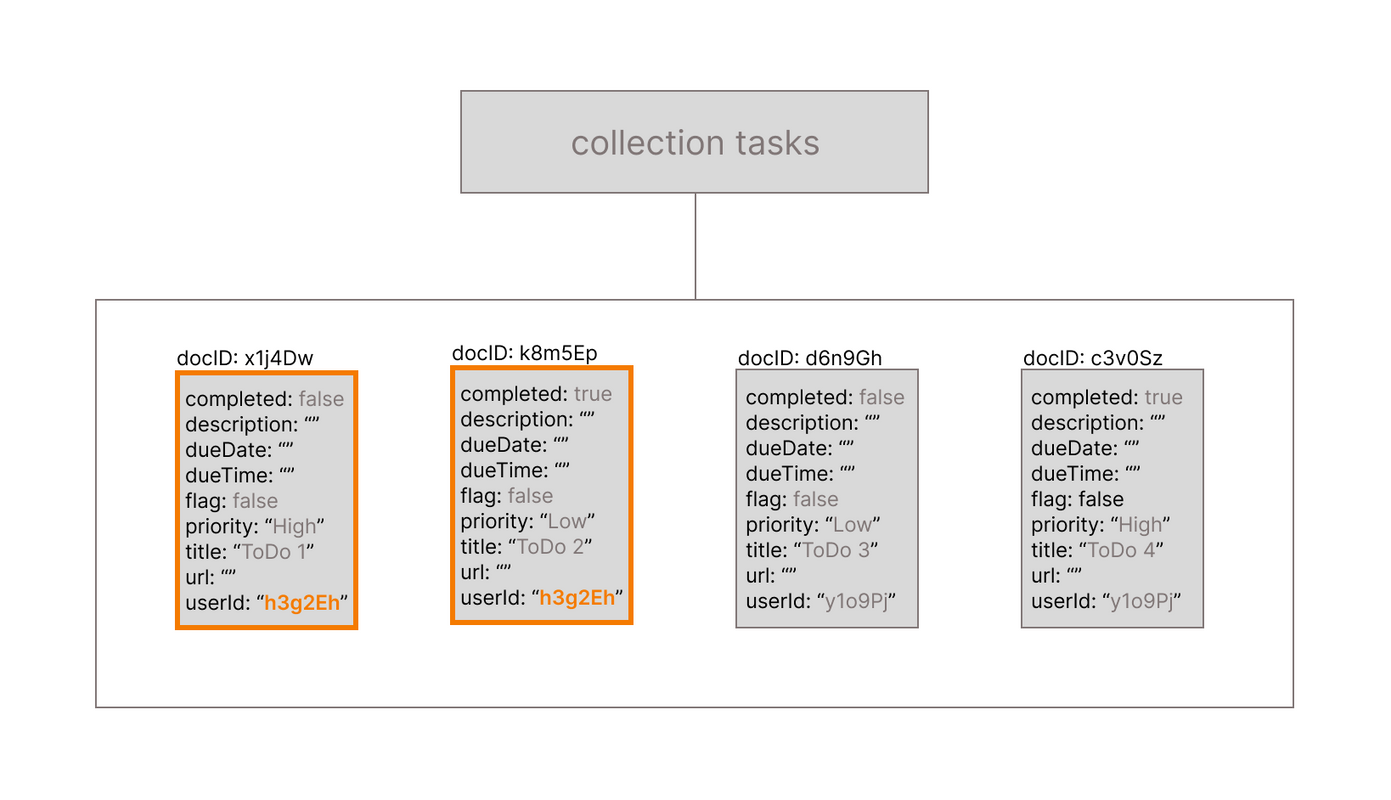
One of the great advantages of Firebase Extensions is that they are flexible, so you can adjust them according to the data model you have chosen for your application. In the image above we can see that we have a collection named tasks, where each document represents a task and has a field named userId, that corresponds to the account id created by Firebase Authentication. We can fetch these documents from Cloud Firestore using the whereEqualTo method, checking that the account id is the same as the one stored in the userId field. For this database approach, the Delete User Data Extension will search for the account id inside the userId field to know which documents to delete from the database. The image below highlights the documents that would be deleted if the user with id h3g2Eh was deleted:
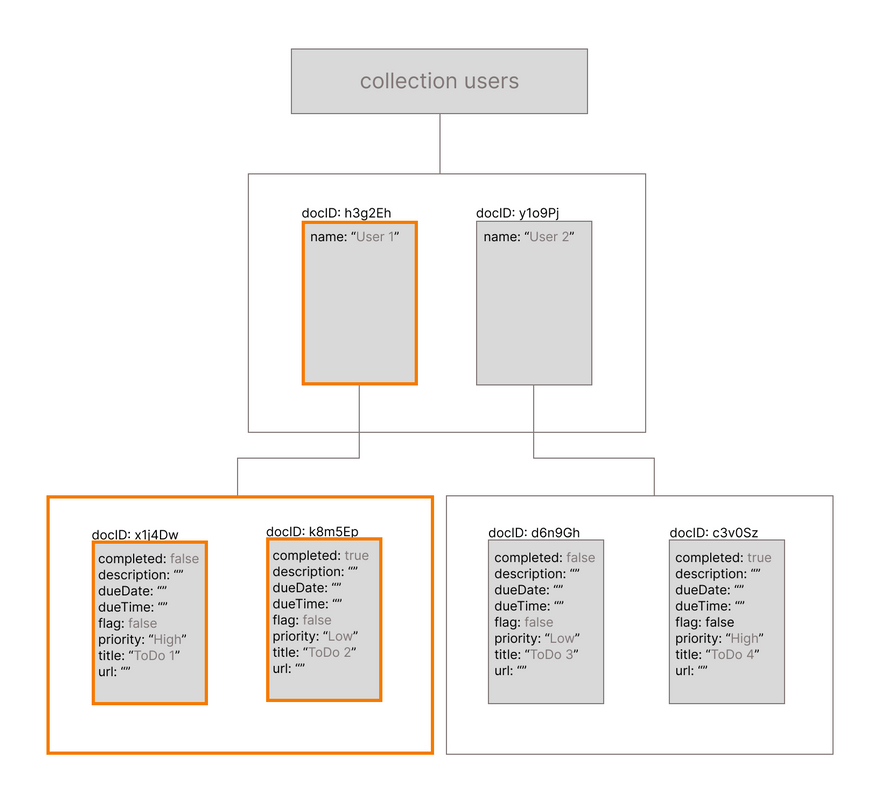
Another possible database approach for a to-do list app would be to have a collection named users, where each document would represent one user, and all the tasks belonging to that user would be stored in a subcollection. The Delete User Data Extension would also work in this case, as it would be able to delete the document representing this user in the users collection, which would also delete the subcollection that contains all the tasks created by that user. The image below highlights the documents and subcollections that would be deleted if the user with id h3g2Eh was deleted:
Let’s see below how to install this Extension and how to configure it for each of these two database approaches.
Installing the Extension
Differently than many other Firebase services, this one does not require us to add any dependency to the Gradle configuration file on Android apps. This extension will be triggered whenever a user account is deleted. This is a backend operation, and doesn’t require any interaction with the client. All we need to do is install this Extension on the Firebase project that we created for this app, so that whenever a user is deleted in this Firebase project, the Extension searches Firestore for all documents related to this user. To get started, let’s navigate to the Extension page:
You can find all the requirements for this Extension on that page. In this case we need to be using Firebase Authentication to create and store user accounts, and the Extension can only delete user data stored in one of our storage services: Realtime database, Cloud Storage or Cloud Firestore. We’re already using Authentication and Firestore on Make it So, so we are able to install this Extension right away.
When we click to install the Extension, the Extension hub will take us to the Firebase console, where we can choose the Firebase project in which we want to install this Extension. After clicking on the Make it So project, we can see a page with all the steps:
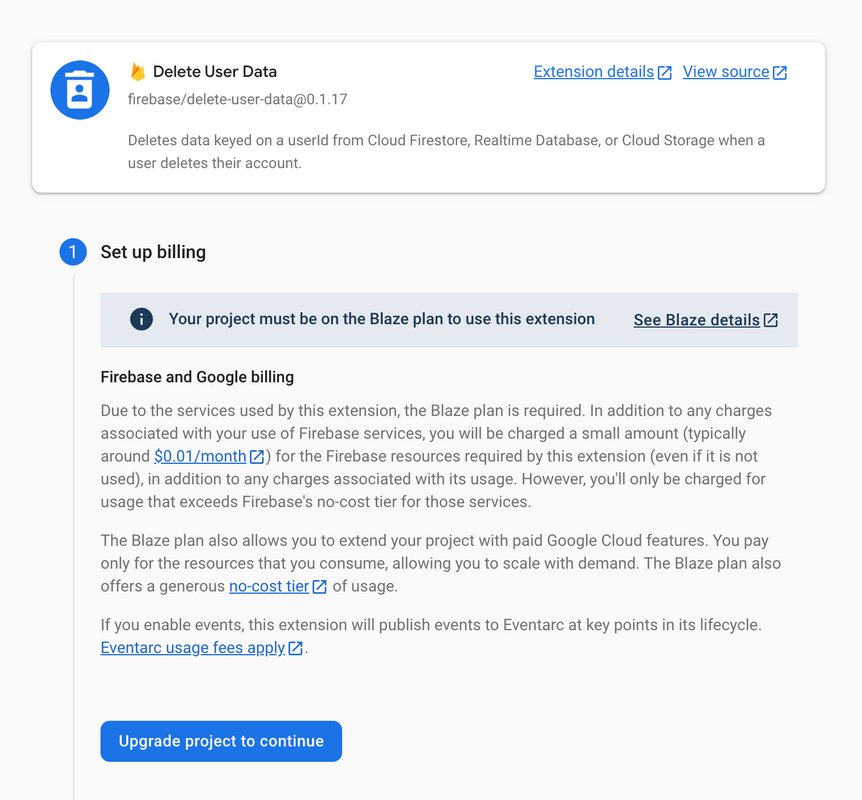
The first step is to upgrade the project to the Blaze plan. To do so, we need to set up a billing account in the Google Cloud console. If you want to better understand how the different pricing plans work in Firebase, watch the ”Billing in Firebase” video on our YouTube channel.
Once the project is upgraded to the Blaze plan, the next step is to review the APIs enabled and resources that are created after installing this Extension. After reviewing it, we can proceed to step 3, where we review all accesses granted for this Extension. Once it’s all done, we can start configuring how the Extension will identify the data that needs to be deleted.
Configuring the Extension
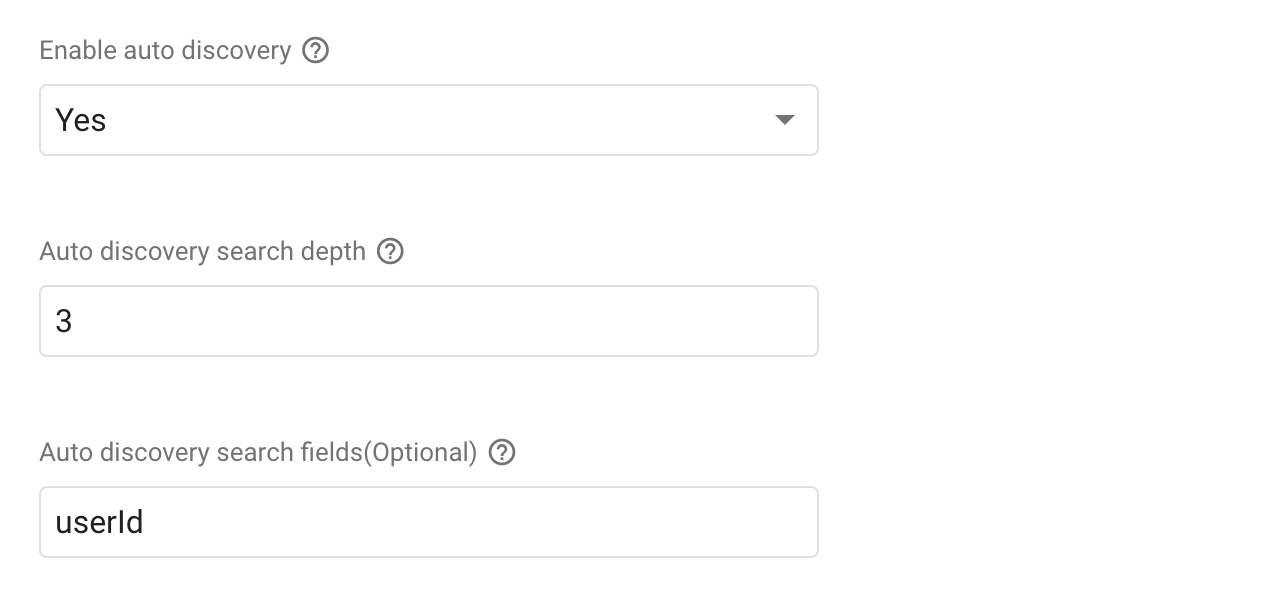
For the database approach used in Make it So, there are three parameters we need to configure: first we need to enable Auto Discovery, so that the Extension can search for documents based on information stored in fields. Once enabled, we tell the Extension which field names can contain the user id (in this case we are using userId), and how many levels within Firestore collections it should go through in this discovery process.
Once a user is deleted, the extension collects all documents that need to be deleted along with that user, by looking for documents that have a field named userId with the id of the recently deleted user. Once it has collected all the documents, it performs the delete operation in a transaction. We can see the Extension configuration in the image below:
In case we decided to use a different approach, like having a collection of users, the Extension configuration will be slightly different. We will need to configure the paths inside Firestore that need to be searched to find data that belonged to the deleted user account. It is possible to specify paths for Firestore, Realtime database and Cloud Storage:
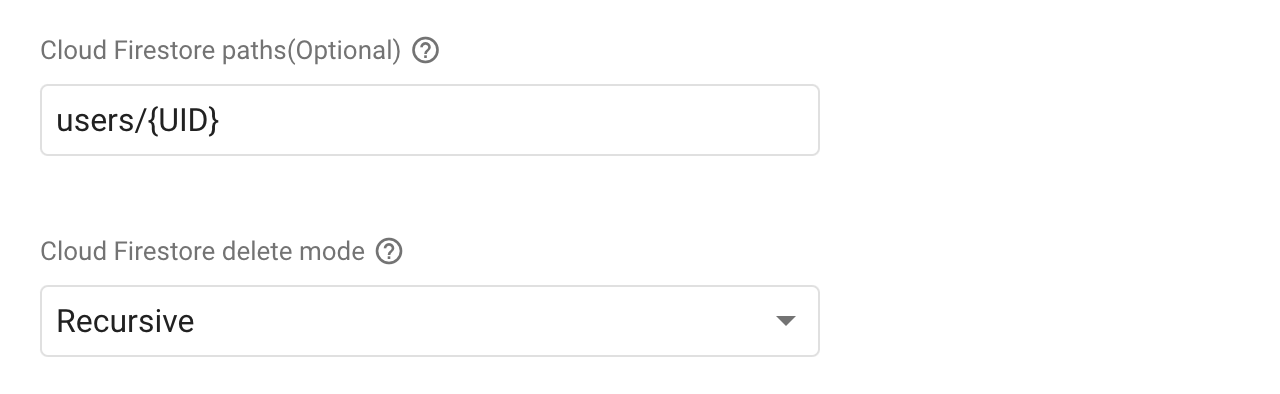
As you can see in the image above, we are going to use the path users/{UID}, because the collection is called users, and we want to delete all the documents whose id are the same as the UID of the recently deleted user. The other parameter we need to configure in this case is the deletion mode, which we are going to use recursive. When we set this parameter to recursive, it means that all documents in subcollections will be deleted as well, which is exactly what we want, since each user’s tasks are documents in subcollections.
Updating the code
Now that the Delete User Data Extension will take care of deleting all documents owned by the deleted user, we can go back to the Make it So codebase and remove the method deleteAllForUser from StorageServiceImpl:
override suspend fun deleteAllForUser(userId: String) {
  val matchingTasks = currentCollection(userId).get().await()
  matchingTasks.map { it.reference.delete().asDeferred() }.awaitAll()
}
The onDeleteMyAccountClick method calls the deleteAllForUser method right before deleting the user account, so we need to remove that call from there as well. Using the Delete User Data Extension is better because we don’t run the risk of the method execution being interrupted before being finished (for example, due to problems with the internet connection or the app crashing), and therefore we don’t run the risk of deleting only a few documents, or even worse: deleting the documents, but never deleting the account!
In short, the Delete User Data Extension makes this process much simpler, more efficient and safer!
What’s next
Next in this series we will go through the steps to add Firebase Cloud Messaging to Make it So, and I will show you how to build a dialog with Jetpack Compose to explain to the user why they need to enable the notifications permission for this app.
You can clone the source code on the Github repository - all the code you saw in this article is available in the v1 folder. If you’re also interested in iOS/Mac development, the same application is available for these platforms as well. The iOS/Mac version uses SwiftUI for building the user interface, which also follows the declarative UI model, similarly to how we build UIs in Compose. You can find the source code in this Github repository.
If you have any questions or suggestions, feel free to reach out to us on the discussions page of the repository.