
This is the ninth part of a series of articles that dive into creating a new Android application from scratch using Jetpack Compose for the user interface and some other tools offered by Google, like Firebase Authentication, Crashlytics, Cloud Firestore, Performance Monitoring, Remote Config, Firebase Extensions, Firebase Cloud Messaging and Hilt. If you want to catch up on the series from the beginning, check out these articles:
- Overview of how this app is structured.
- Implement login and sign up flows using Firebase Authentication.
- Add Firebase Crashlytics to handle errors.
- Store data in the cloud using Cloud Firestore.
- Add Kotlin Coroutines and Kotlin Flow.
- Improve the app’s quality with Firebase Performance Monitoring.
- Control app behavior and appearance remotely using Firebase Remote Config.
- Add new features to your app with little effort with Firebase Extensions.
In this ninth part you will learn what Firebase Cloud Messaging (also known as FCM) is, what you can use it for, and how you can add it to your Android app to display push notifications to your users. You will also learn how to display push notifications on devices with different Android versions, and how you can prepare your Jetpack Compose UI to show the permission dialog when necessary.
Firebase Cloud Messaging (FCM)
What is FCM?
Firebase Cloud Messaging is a service that enables you to reliably send messages at no cost, and it works with all the platforms that Firebase supports: Web, Android, iOS and other Apple platforms, Flutter, C++ and Unity. With FCM you can send notification messages or data messages, where you can configure custom key-value pairs to send a data payload to the client app.
What can I use FCM for?
You can use FCM to send messages that are useful in a variety of scenarios. For example, sending notifications to app users so they can engage in app content such as chat messages from friends or triggering your app to sync in the background so it is always up to date when the user opens it.
You can also be very versatile when targeting who will receive your messages, since you can distribute messages to your client apps in different ways: to individual devices (based on a device token), or to devices that are subscribed to specific topics, or you can use the Firebase console’s messaging campaigns interface to generate notification targeting your Google Analytics audiences.
Add FCM to your app
There are a few steps you need to take to add FCM to your Android app and to be able to show the push notifications to your users. You also need to prepare your app to deal with different Android versions, as for most of them you need to ask for the user’s permission to send notifications, while other versions will allow you to send push notifications right away without asking for permission.
As explained in the first part of this series, the app we’re building is a simple to-do list application called “Make it So”, so all the code samples shown on the steps below are taken from this codebase.
Add the SDK
The first step is to add the FCM SDK as a dependency in the app/build.gradle.kts file:
implementation("com.google.firebase:firebase-messaging-ktx")As Make it So is using Firebase’s Bill of Materials (also known as BoM) to add Firebase dependencies, you don’t need to add the specific FCM version here. You just need to specify the BoM version and it will make sure to pull the version of FCM that works well with all the Firebase SDKs you’re using in your Android app.
Update Android Manifest
The next step is to create a messaging service that extends FirebaseMessagingService and add it to the AndroidManifest.xml file. You need to wrap it inside a service tag and specify the MESSAGING_EVENT intent filter (required to receive notifications when the app is in the foreground), as seen below:
<service
    android:name=".MakeItSoMessagingService"
    android:exported="false">
        <intent-filter>
            <action android:name="com.google.firebase.MESSAGING_EVENT" />
        </intent-filter>
</service>
<meta-data
    android:name="com.google.firebase.messaging.default_notification_channel_id"
    android:value="@string/default_notification_channel_id" />
<meta-data
    android:name="com.google.firebase.messaging.default_notification_icon"
    android:resource="@mipmap/ic_launcher" />
<meta-data
    android:name="com.google.firebase.messaging.default_notification_color"
    android:resource="@color/dark_orange" />
You can also provide a default channel id, which is the id of the notification channel you will assign your notifications to. Notification channels are supported and recommended when you’re running your app on devices with Android 8.0 (API level 26) or higher. Lastly, you can customize the default icon and default color of notifications directly in your Android Manifest, as you can see in the last two meta-data tags.
The messaging service
The messaging service in Make it So is called MakeItSoMessagingService, and it extends from FirebaseMessagingService, as you just saw in the section above. Next, you need to override the onMessagedReceived function in order to display the notification to your user even when your app is in foreground:
override fun onMessageReceived(remoteMessage: RemoteMessage) {
    remoteMessage.notification?.let { message ->
        sendNotification(message)
    }
}

@OptIn(ExperimentalMaterialApi::class)
private fun sendNotification(message: RemoteMessage.Notification) {
    val intent = Intent(this, MakeItSoActivity::class.java).apply {
        addFlags(FLAG_ACTIVITY_CLEAR_TOP)
    }

    val pendingIntent = PendingIntent.getActivity(
        this, 0, intent, FLAG_IMMUTABLE
    )

    val channelId = this.getString(R.string.default_notification_channel_id)

    val notificationBuilder = NotificationCompat.Builder(this, channelId)
        .setContentTitle(message.title)
        .setContentText(message.body)
        .setSmallIcon(R.mipmap.ic_launcher)
        .setAutoCancel(true)
        .setContentIntent(pendingIntent)

    val manager = getSystemService(NOTIFICATION_SERVICE) as NotificationManager

    if (Build.VERSION.SDK_INT >= Build.VERSION_CODES.O) {
        val channel = NotificationChannel(channelId, CHANNEL_NAME, IMPORTANCE_DEFAULT)
        manager.createNotificationChannel(channel)
    }

    manager.notify(random.nextInt(), notificationBuilder.build())
}
You can also override the onNewToken function, in case you need to keep a record of the most up to date FCM token. If you want to better understand what FCM tokens are and why they’re needed, check out the official documentation on the best practices for registration token management. If you’re already familiar with FCM tokens and want a real life example of token management, check out this article on the Firebase blog with a code example of how to generate, retrieve, store, and update registration tokens using Cloud Firestore and Cloud Functions for Firebase.
Ask for Notification permission
From now on, your app is ready to use FCM. However, for Android devices running Android version 13 or higher, there’s a new runtime permission for showing notifications. The first step to handle this new runtime permission is to add the POST_NOTIFICATIONS constant to your Android Manifest. But if you’re using FCM version 23.0.6 or higher, the FCM SDK already includes this POST_NOTIFICATIONS constant, so the only thing you need to do is show a dialog to the user asking them to grant the notification permission to your app.
If the user grants the permission, you’re good to go and you can start sending notifications to that device. But if the user declines the request, it’s a good practice to show them another dialog explaining why showing notifications is important for your app so they can feel more confident about granting this permission. It’s worth mentioning that if you fall on the second case, you won’t be able to show the native Android dialog asking for permission again. Instead, you can instruct the user to grant the permission through the settings app.
Add the Accompanist permission library
Google has an experimental Compose repository called Accompanist, which contains a library for runtime permission handling in Jetpack Compose. This library helps implement the flow explained above, by providing you the rememberPermissionState function. I’ll cover what this function does in the next section, first let’s add the Accompanist dependency to the app/build.gradle.kts file:
implementation("com.google.accompanist:accompanist-permissions:0.30.1")Show the permission dialogs
The first step to implement the permission dialog flow in Android devices running Android version 13 or higher, is to check the devices’ version. Only devices running Android 13 or higher should get into this flow. To do this, add the following to the first Composable in your app (which in Make it So is called MakeItSoApp()):
if (Build.VERSION.SDK_INT >= Build.VERSION_CODES.TIRAMISU) {
    RequestNotificationPermissionDialog()
}
Inside the RequestNotificationPermissionDialog function, get the permissionState using Accompanist’s rememberPermissionState function:
@RequiresApi(Build.VERSION_CODES.TIRAMISU)
@OptIn(ExperimentalPermissionsApi::class)
@Composable
fun RequestNotificationPermissionDialog() {
  val permissionState = rememberPermissionState(permission = Manifest.permission.POST_NOTIFICATIONS)

  if (!permissionState.status.isGranted) {
    if (permissionState.status.shouldShowRationale) RationaleDialog()
    else PermissionDialog { permissionState.launchPermissionRequest() }
  }
}
What the code above does is: it checks if the notification permission is already granted (because in this case, there’s nothing else that it needs to do). Then, it checks whether it should display the RationaleDialog or the PermissionDialog. The RationaleDialog tells the user that this permission is important, and instructs the user to navigate to the settings app. The PermissionDialog tells the user that the permission is important and launches the native Android dialog for notification permission.
You can visualize this flow in the screens below: first we launch the PermissionDialog, then the user clicks on the “Request permission” button and it launches the native Android dialog. If the user grants permission, nothing else happens. If the user doesn’t allow your app to send notifications, then the RationaleDialog is shown, as seen in the third screen below:

Time to test!
Now that you finished implementing the messaging service and the flow to display the permission dialog, it’s time to test the changes! Run your app on an Android device and grant the notification permission using the dialogs shown in the section above. Once the notification permission is granted, you can proceed to send a test message.
Get the device token
To be able to send a test message to your test device, first you need to have access to your device’s token, as you need to input this information on the FCM dashboard when sending test messages. The first step to get this token is to add the following code to your app, as soon as the app starts:
launchCatching {
    val token = Firebase.messaging.token.await()
    Log.d("FCM token:", token)
}
The next step is to run the app again and search for “FCM token” in the Logcat tab of Android Studio. Copy that token and open your Firebase project in the Firebase console.
Send a test message from the Firebase console
Once in the Firebase console, navigate to the Messaging dashboard and click on “New campaign”, then choose the “Notifications” option. Fill in the required fields and click the “Send test message” button.
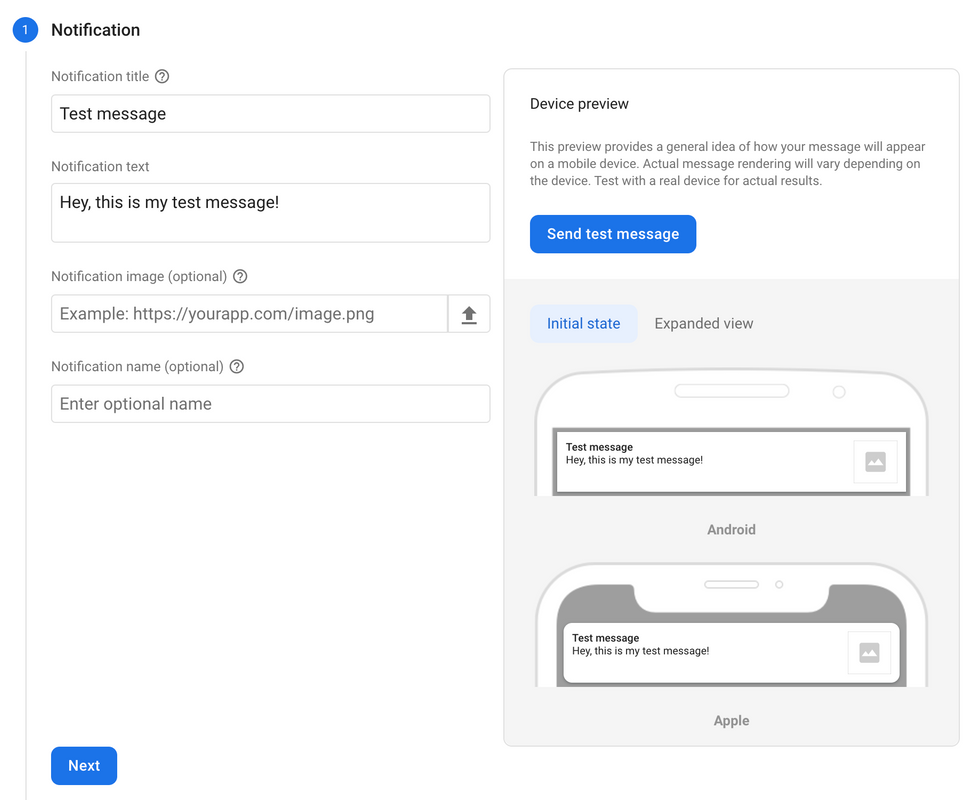
When you click this button, a box will appear on the screen asking you to enter the token of the device you want to send the test notification to, as seen in the image below. Paste the token you just copied from the Android Studio Logcat into that box and click on “Test”.
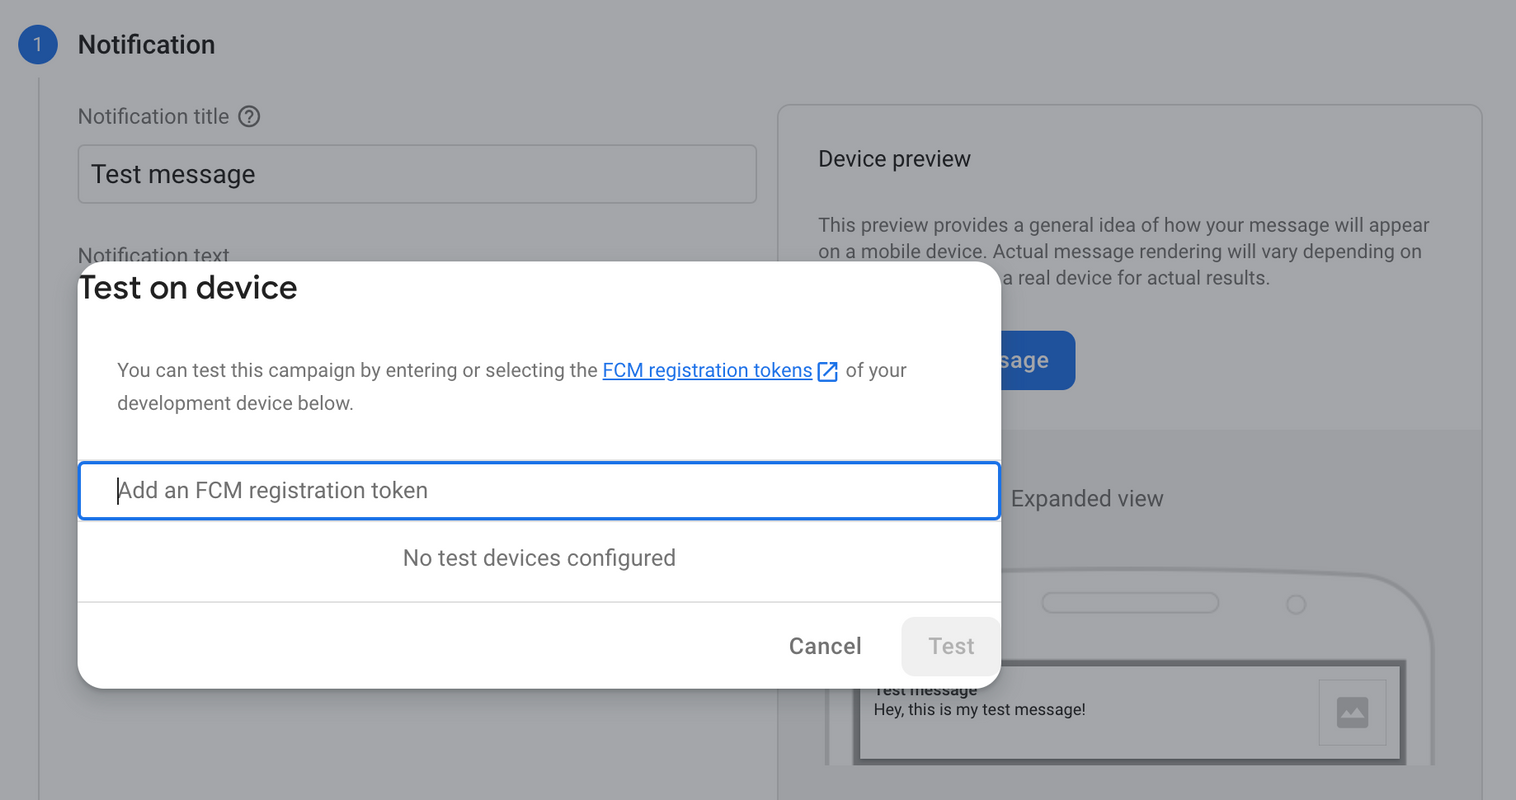
Now Firebase Cloud Messaging will send the test notification to your test device. The notification should arrive regardless of whether your app is in foreground or background. In fact, you can send two test messages to confirm that the notification is arriving in both scenarios. This is how the test notification looks like for Make it So:

What’s next
Part ten of this series will show you how to build complex queries to retrieve documents stored in Cloud Firestore. You will learn how to use where, or, and , in, count and orderBy operators to easily filter and order documents that meet a specific criteria.
You can clone the source code on the Github repository - all the code you saw in this article is available in the v1 folder. If you’re also interested in iOS/Mac development, the same application is available for these platforms as well. The iOS/Mac version uses SwiftUI for building the user interface, which also follows the declarative UI model, similarly to how we build UIs in Compose. You can find the source code in this Github repository.
If you have any questions or suggestions, feel free to reach out to us on the discussions page of the repository.